Showing posts with label Star Wars Armada. Show all posts

Sunday, 30 October 2016

The Battle for Axamar

Well, this was a three stage engagement, with both ground troops, fighters and the fleet involved. 

The three missions were as follows. The fighters would screen transports ships as they left the base, the Fleet would wait to hyperspace ambush the imperial fleet as it arrived, and the special forces team would defend the base personnel and take the last transport out. 


The stakes were high as any failed mission would impact on the rebels command structure during the next phase.  


Battle one: Fire in the sky of Axamar

The rebels were going to be outnumbered in this one, but they had two simple goals. Get the transport off the table and kill the bombers so they couldn't get the next transport off the line. 

I was forced to deploy randomly, so split my deployment into 6 zones and rolled for where each squadron went. 


8 ties with no upgrades, 4 basic intecerptors, and 4 bombers with torpedoes and missiles for transport blasting. 


The rebels countered with 4 Awings with concussion missiles, 4 X-wings with Torps, and Airen Cracken in his Z-95. 


Things started pretty normally, with the rebels attempting to use their concentrated mass of fighters against the bombers and one group of ties before the interceptors and 2nd squad of ties could get in position. (Dr Vox just loves the camera, and yes, hes wearing an armoured hoody)


Unfortunately for the rebels, the Empire slammed on the breaks in their Tie Bombers and the A-wings, who were expecting them to fly full speed ahead towards the transport, were totally out of position. 
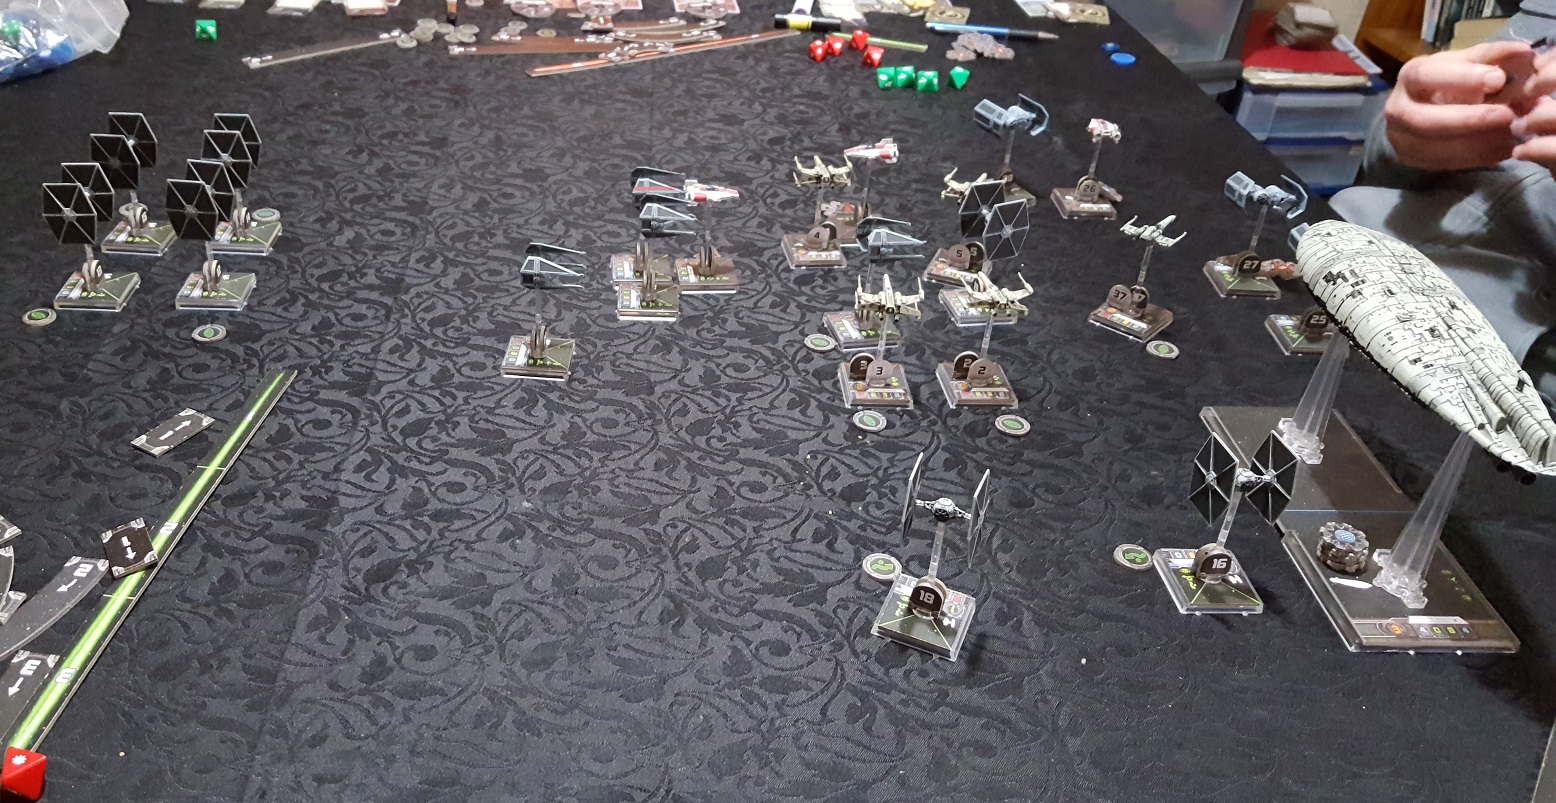


This allowed the bombers to punch right through the formation, and while there was some scrappy dogfighting in the grand melee, things did no go well for the rebellion. 


Once through the breach, the lead bombers hit the rebel transport with everything they had. And while the interceptors kept the rebel fighters busy, the second tie squadron crashed in on the other flank. 

Caught in a crossfire, the rebels started taking heavy damage, and once through the line, the bombers fled the engagement zone to attack the next transport leaving the surface 


Round one in the Battle for Axamar was a solid Imperial victory, with the rebels losing half their fighters before retreating, and the Empire taking out the Rebel transport and getting two bombers off the board edge. 


Battle Two: Begin planetary bombardment


While the fighters were engaged, the capital ships had a different mission. The Imperials objective was to bombard the rebel base, while the Rebels had to prevent them from doing so, and force them to retreat and get reinforcements before continuing the attack. 


The Imperial Squadron, led by the Imperial Star-Destroyer "Malice" and it's victory class bombardment specialists. Heading straight for Axamar. 


However, using "hyperspace ambush" the rebel attack fleet, supplemented by a massive expenditure of favours with Rebel high command to include a Mon Cal cruiser for the fight, were in prime position to exploit the Imperial fleet deployment. 


This is because our leaders get to make a tactics roll, and based on that roll, they can buy upgrades, including flank deployment. In this battle, they had rolled well enough to get 2nd deployment and a flank deployment. Which was huge. 


The Empire decided to break for the planet Axamar and pound it instead of breaking and engaging. They knew they would not be easily able to turn the fleet to engage before the rebels were on them, so it was full speed ahead for the Victory destroyers, while Malice would turn and engage the rebels to buy time.  


In, what can only be described as some amazing admiral skills, the Rebels were almost always out of firing arcs when the Empire came to shoot, but right within range when the rebels could return fire. 

Malice was absolutely mauled by the Mon Call cruiser, yet could never return fire on it until it was much too late. 


However, the Victory cruisers made it to the planet while the rebels were flanking and gave it a solid bombardment. Damage cards were piling up on the rebel base, and they would greatly impact the next scenario. 


This did nothing to save Malice, who could simply not bring her guns to bare on the Mon Cal cruiser, and was ripped to pieces by it, causing the Empire to signal a retreat to wait for reinforcements. 

So while this was a major victory for the Rebellion, the personnel on the ground paid a heavy price, and the base took 10 damage card worth of bombardment. 

As we will see in the next battle, this changed the scenario completely. 


Battle Three: Get to the transports


Imperial troops had landed and the main base evacuated, but the secondary command center, designed to cover the retreat, had been badly hit. 

In the Hangar at the rear of the base, three transports were ready to take survivors away. But no one was moving in the base. 


The special forces team job was as follows. 

  • Deploy at the doorway outside the base
  • Retrieve as much data and sensitive material as possible from the base (as depicted by the cards on the map)
  • Rescue as many of the survivors as possible. 
  • Get to the transports, which had limited capacity 


The base was a wreck, and there were internal fires, smoke, impassable areas, and rubble that would need to be cleared. As the team moved through the base, they would uncover survivors and material. 

But they would be on a very short timer. 


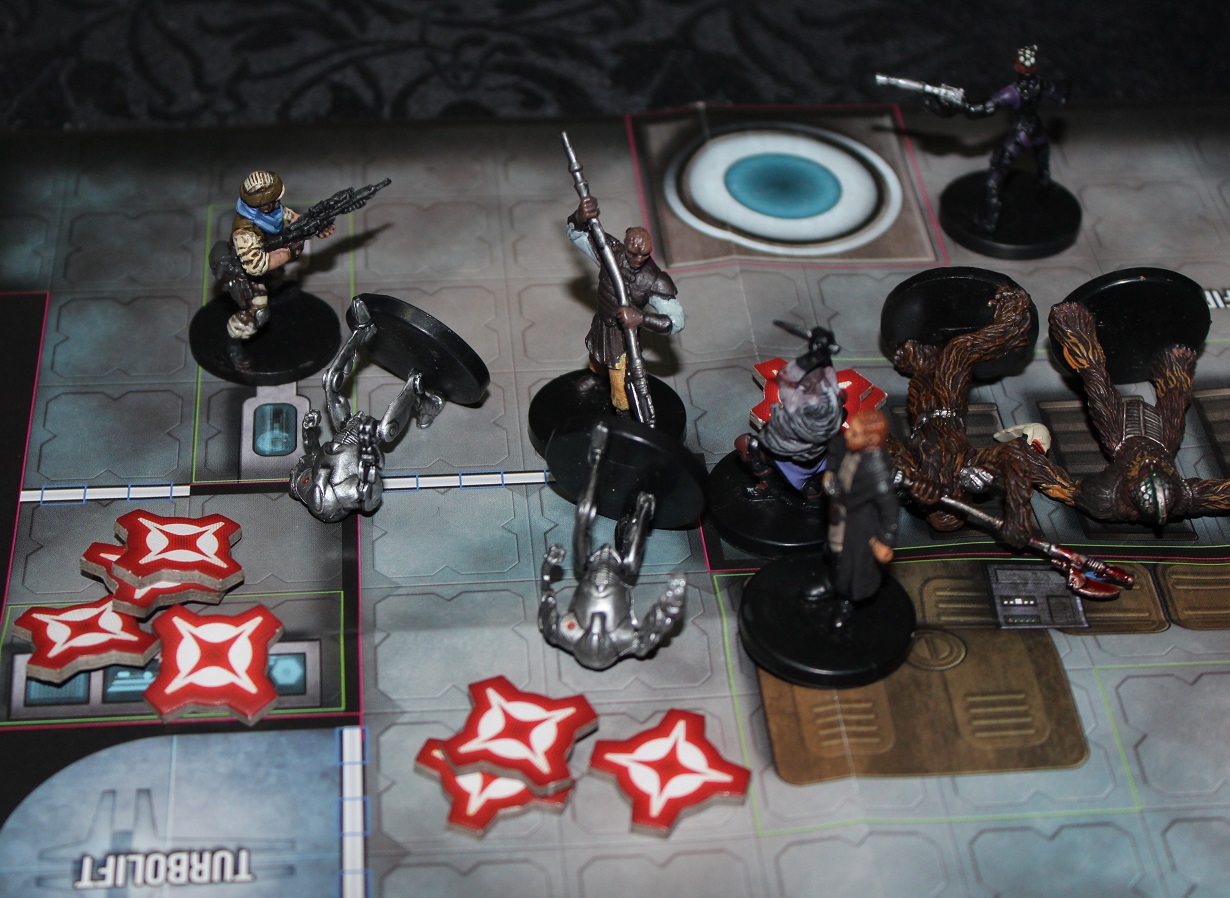
Following them into the base, was every Stormtrooper I could muster and an AT-ST for a laugh (even though it couldn't get inside the base)


As you can see here, smoke and fire was really starting to spread, and the time pressure in this scenario was the real driver. The team had to split up, make calls that included leaving one trapped rebel officer to die in a fire, and rush for the transports. 


Eventually, the team cleared a path to the transports and fought a rearguard action to slow the Imperials down so their allies could reach the transports. 


But overwhelming numbers mean't they could only delay, and once the bases crew were onboard the transports, the assault team bolted and ran for the transports. 

Almost all the secure data and base personnel recovered, and two of the heroes were wounded. But it felt very close and tense the whole way through. 


Final outcome


Imperial fighters carved a hole in the rebel transportation corps and the fleet had a good day against the empire, while still allowing the Empire to bomb the rebel base. 

But in the end, the ground forces managed to pull off a close win and save the rebellion from catastrophe. Still, there will be some rolls in the resolution phase to see just how bad the damage was, and if anyone didn't make it out. 


Thursday, 7 April 2016

The first battle of Luxon - Talathen Sector battle report

Luxon is under attack, and the rebels responded with a series of two missions.

Luxon ground operations 

First up, The luxon Militia need help taking control of a series of underground junctions, and to destroy the entry and exit points for imperial reinforcements.

They had 6 satchel charges, and need to spend an action to place them and an action to detonate them. If the Imperials were close, they could deactivate the charges. 


The team moved into position, two characters and some soliders for support attacking on each flank.

By the way, isn't Space Hulk 3rd edition just damned good to look at. Such nice components and perfect for the tunnel fights in Luxon


With satchel charges blowing the main corridors, the team moved in to defeat the E-Webs and officers defending the control station. The other objective was for the team to rewire the consoles, so that Luxon forces could control tunnel and gate access in the region. 


One e-web down, and the rebels close the noose. One big gun, even one that can fire three times, isn't enough to slow the rebel advance. 


With the guns down, the Rebels quickly hunt down and eliminate the imperials in the communications centre. Meanwhile, imperial reinforcements flock around to cut off the rebel escape. 


 With their escape route cut-off the rebels were forced to fight their way back down a stormtrooper infested corridor. And while they made it, two of them were badly injured and all their support troopers died.

A high price, but now the Luxon militia controls this sector, and the imperials will have to burn their way through. Which has slowed their invasion considerably. 


The Battle in Space

The Luxon groups forces need supplies desperately, so the Rebel fleet decided to smash through the Luxon blockade to deliver the desperately needed materials.

They did so easily, but as they turned away from the planet they were boxed in by a squadron of four star destroyers. They needed to blast past them, protect their transports, and make it out of the planets gravity well and into hyperspace. 


Three corvettes, an assault frigate and a Nebulon B were matched up against three victory destroyers and a gladiator. 


The rebels plan was simple, push the freighters to the side of the board and screen them with other ships. Then put the hammer down and get off the board as soon as possible. The freighters (represented by X-wing transport tokens) had 6 hull and could move speed 3. They activated after fighters. 

In what I considered a bold move, I threw the Gladiator ahead hard and fast on the first turn. I had the good fortune of acting first next turn and being in pefect range against Jaina's light, a Corellian Corvette. I got to roll many many black dice, and the corvette was blown to pieces. First blood to the Empire.

Unfortunately, the assault frigate did exceptionally well on return fire, and two turns later, the Gladiator was lost with all hands. 


The Imperial fleet split up, one Victory trying to close down the freighter on the near side of the board, while the other two close on the pair on the far side. 


Dramatically working to screen the freighter, the Nebulon-B frigate "The Pride of Luxon" under command of the infamous "Beast of Luxon" took heavy damage at point black range. But the ship kept moving and redirecting shields, and every hit it took was one the freighters did not. 


That freighter got away (with 1 hull remaining), but one of the freighters on the far side of the board was blown to pieces by the combined fire of two victory destroyers. When the dust settled, and the Rebels hit hyperspace, they had saved their fleet, with the cost of 1 corvette and 1 freighter. While taking down a Victory destroyer and a Gladiator. 

A nice, well played victory.

Next time, we will look at the Nimbala campaign. 


Friday, 27 November 2015

We're Back! - Talathen battle sector report

Well, its been a while since we updated for numerous reasons. A few people have been away on business trips or personal holidays, and our one of our players is also a new dad since the last update! So a heap happening in "real life" and that's more important than the fate of Talathen sector :)

Things will be getting back to normal in the next few weeks, so I thought I would write up the battle reports that have been sitting around idle for a few months. 


I'll do some very short write ups for the first 3 missions, and a lengthier one for the finale. (I didn't have my camera for some of these, so less photos than normal)

Bombing Runs on Luxon


With Luxon now under invasion, the Rebels made some efforts to slow the attack down. A unit of wookies were deployed to support the resistance, and one of the Headhunter squadrons was assigned to interdict bombing runs made on Luxon positions. 

This scenario was as follows. Each bomber had a total of 3 bombs/missiles. Each unused bomb or missile that made it off the board was a VP for the Empire, each bomb/missile used by the Empire or unused when the bomber was killed was a VP for the Rebellion. 

This was a great little battle, with the Headhunters dueling with the Tie Fighter screen while the Bombers tried to push through. 

One pair of bombers were annihilated in short order after using their missiles once ganged up on, giving the Rebels 6 VPs. But the second pair flanked right and went full speed for the edge, covered by a pair of ties. While the Headhunters pursued and landed some hits on them, it wasn't quite enough to stop them. 6VP's to the Empire and a tied scenario. A nice close game. 

Harassing the blockade of Zenith

With Zenith under blockade, the X/Y wing squadron was deployed to hamper it's effectiveness. To this end, they targeted a group of deep space "hyperjump scanners" that would notify the Imperials of incoming ships from Hyperspace. 


The Rebels were over matched in this fight, 3 Y's and an X vs 4 interceptors and Snattercat, the local Tie Advanced Ace (A fully kitted out ace with vaders card).

In a smart move, the Rebels ignored the Ties and focused on their objectives. Going full speed for the transmitters, they destroyed them easily, although after exposing their flanks to the Ties they did suffer some causalities. 2 Y-wings shot down, but 100% mission goals completed. 

One of the things with scenario play is that you can have overwhelming odds if the objectives are finite enough and it's still winnable. 


Distraction of Samoth 

One thing that concerned the rebels during this rounds planning was the actions of a Victory Star Destroyer in Samoth. It was launching probe droids in the area and appeared to be searching for a hidden rebel base. 

Instead of just letting this happen, the rebels decided that if they attacked the Star Destroyer, it might intensify search efforts on a planet where the rebels have no bases or major support.

The plan was to hit the Victory with 4 correlian corvettes in a drive by attack. Unfortunately, I forgot I only have 3 Corvette models and forgot to ask my players to bring a 4th, so we subbed in a Neb-B from the fleet for the other 2 corvettes. 


This battle was quite interesting, with the rebels harassing the Victory but staying clear of it for the 1st half of the battle. That changed when the Victory surprised the Rebels by quickly turning and accelerating to escape. 

Of course, it wasn't fast enough to escape the engagement zone before taking too much damage, and in a final effort turned back to engage the corvettes with a broadside.

And yet again, a Victory destroyer is rammed to death by Corvettes. 


Mission sucessful, although the Victory did put a fair amount of damage onto the attacking ships in the process. This will certainly get the Empires attention.

Conclusion


Good to be back typing this up, next time, the dramatic assault on the Imperial Asteroid base orbiting Selano, and the amazing climax to the best battle of the campaign to date. 


Friday, 31 July 2015

"He was the best of us" - Round 3 Battles - Talathen Sector Campaign

The last few weeks have gone a bit slower than expected due to my players being ill, so it's been a while between updates. However, here are all three battle reports from the last two weeks. 

Korvas shipyard raid - Fleet action

The empire has been converting a civilian dry-dock into a military drydock. The implications for the rebellion were quite dire, as it would mean faster turn around time for Imperial ships, and therefore, more patrols in the sector. 

The drydock was also big enough to handle Imperial Class Star Destroyers, and Fleet Command wanted it blown up at all costs. The first attempt, a sabotage run was blown almost immediately as the empire were waiting for them and the operative was nearly captured. Throwing all caution to the wind, Fleet command threw everything they had, and everything they could borrow at the problem. 


As our sector fleet is quite small, everything was a Borrowed Assault Frigate from The Alliance Fleet Command, 3 Cr-90's and 8 stands of Z-95's. 

The objective was represented by the space station with 6 shields. That could take any amount of damage after that point, but would be destroyed on a single critical hit. 

Opposing them was one Victory Star destroyer, and 6 stands of tie fighters.

Sounds like a horrible mismatch right? The rebels were deeply suspicious of the table deployment, of the fact they had initiative when they didn't buy it, and the fact i'd asked one of them to bring his spare gladiator. 


The rebels came in fast, faster than I initially anticipated, and went straight for the objective. Then i revealed the hyperspace markers under the debris fields and deployed my gladiators behind them using hyperspace assault. 


A classic tactic, with one massive flaw. I brought them in too slow, so they got one round of shooting before the rebels darted away from them. 


However, in that one round I annihilated one Cr-90 and badly damaged the Assault Frigate. The Captain of the CR-90, Anto Salamon, went down with the ship and was presumed dead.

Although recent information suggests he was captured alive. Poor Imperials, Anto is known for being a pompous arrogant jerk and will no doubt regale them with stories of how the Rebellion will be diminished with his loss, as in his mind he "Was the best of us". 


Things look grim for the rebellion until turn 3, when the whole mission changed on a single dice roll. Taking his pile of red dice, Airen Cracken commanded the damaged assault Frigate to open up on the drydock. And in one volley of fire, all 6 shields went down. The Imperials were very concerned, until his second volley failed to produce the kill shot.

However, two CR-90's were rapidly moving into range, and a volley of turbolaser fire from those two ships produced the critical result needed for victory. 


Slow to respond and turn, the Imperial fleet could do nothing to stop the high speed rebel force from disengaging victoriously. 

This was probably the best mission of the campaign, as it felt like the rebels were doomed when the Gladiators appeared and ripped into them, but they stuck to the plan, kept on moving, and punched a whole through the defences, killed the target and fled with the loss of only one ship. 


Stealing Fighters - Ground command assault on Zenith Storage facility


This mission took place at a hidden hangar facility near the polar icecap of Zenith.

The Alliance received intelligence that a small number of Republic era fighters and other contraband was being stored in this hangar.

The plan was to infiltrate a special forces team into the base, clear the way of resistance and escort pilots to the fighters and have them escape with them.

This was our very first "two-part mission", as we also played out the escape from the planet using X-wing.

The same special forces team participated in this attack as the last Special forces report.

It's worth noting that the picture above is at turn 4 (I forgot to take pics earlier). By this time the rebels had got very busy and had gunnerd down a rather high number of Stormtroopers. 


Yep, 13 models taken out in the first 3 turns. That's some busy killing going on. 

The Special forces team split into two groups. Hallarn (Commander), Keel (Sniper) and Fenn (Himself) acted as a firebase, coming in from the north entrance on turn 1.

Gooda (Gunfighter) and Gaxx (Wookie) come in through the side entrance on turn 2, with the pilots following behind them on turn 3. 


Virtually every shot was a kill by the rebels, it was uncanny. I expected the sheer number of troopers to slow them down, but it really didn't. And while I managed to wound two characters, this mission never looked like it was going to be anything other than a rebel victory after turn 2.

I cam quite close to killing/badly wounding Fenn When he didn't take into account my officers moving the E-Webs and their double shots. But ended up 2 points short (The amount his new armour protected him by.....)

The conclusion from this battle is a minor rules change. Due to Rebel characters being able to heal themselves easily when the pressure is off, I am changing the "no reinforcement" option to "delayed reinforcements" for Imperial Assault.

The Rebels got all their pilots to their ships, picking up 9 Y-wings (including a couple of the version with locked forward turrets) and a surprising 3 X-wings. In Addition, the astromech droids assigned to the ships had been left installed and had all developed unusual personality quirks. (Each of the unique R droids for X-wing was unlocked as a unique card) 


Stealing Fighters - Space Combat with new fighter squadron

This mission wasn't for high stakes, it was like a "bonus round" for the first 3 rounds of the campaign (the first quarter if you would as the campaign will last 12 rounds............ oh wow...... John Cena reference).

The Rebels massively outgunned the Imperials, and the idea was a mini-competition to see who could kill the most Tie-fighters.

Each player got 2 identical ships from the following options, once one option was gone, a player had to pick another, and they picked in "reverse glory" order


  • Grey Squadron Y-wing with Ion Turret
  • Gold Squadron Y-wing with Ion Turret and Proton Torps
  • Rookie X-wing with Proton Torps
  • Gold Squadron Y-wings with blaster turrets locked in forward position. 
I preplanned the Tie Fighter squadrons moves before the game. Fly forward on turn 1, turn in on turn 2, and cross on turn 3, k -turn back on turn 4.


Very tidy formation playing if i do say so myself. 

Still, the idea was to give the guys a final "hit-out" for this section of the campaign, let them experience the new fighters (and cheer for making the Z-95's obsolete).

Final kill totals


Luxon Militia (X-wings)  - 3
Basra Consortion (Y-wing variant) - 3
People's movement  (Y-wing gold) - 2 
Republicans (Y Wing Grey) - 0

A 2 to 1 points differential in a game makes for a really funny and quite different experience. 


Round 3 will conclude with one and a half roleplaying session, followed by the end phase. Then the campaign will take a break for a month or so. 

Sunday, 28 June 2015

Battle reports round 2 - Battle for Talathen Sector

Fleet attack on deep space training station

After rolling a lot of sucesses on his planning roll, this was going to be a short and swift action. The empire has been well and truly caught with it's pants down, as the end of round two photo below shows. 

I'd like to note that from here on in, the battles will be getting harder. The training period is over, so this should be the last "turkey shoot", unless the players roll exceptionally. From now on, an "even roll" on a planning mission will have them outnumbered and outgunned. it's only fair, they are the rebels after all.


This missions fielded 8 stands of z-95s (3 Speed, 4 shoot, 4 hull, 1 red anti-ship, escort), A nebulon B support refit (borrowed from the rebel fleet), a CR90 and a CR90b vs two Victory I's with no fighter screen. It was never going to be a straight up fight, but I really wanted to test how the empire would perform in from such a terrible position.


The Rebels came in a lot slower than I expected, so by the time we got to engagement range, I had managed to swing both Star destroyers around, and found myself able to target two ships most rounds with side and rear arcs. I didn't manage a single frontal shot in the whole game :(

Splitting formation was a mistake, I should have turned both ships the same way at slightly different speeds. This allowed the rebel fleet to focus fire on one Star Destroyer. The poor guy on the right of this picture.

Accidentally, the Nebulon B crashed into the Victory on the right, which prompted us to go to the "ramming" rules.

As a result, this mission ended in a hail of ramming at point blank and fighter attacks against un-shielded quarters. I find it quite pleasing that I managed to damage each of the rebel capital ships, knocking down most of their shields and forcing some to use engineering orders.  


Still, a hopeless fight is a hopeless fight, and when the Victory on the right exploded, it was close to "go-home" time. So I called the mission a solid Rebel victory, even though one Victory managed to jump to lightspeed to escape. 


Special forces free slaves on Nimbala

This was another massively successful planning roll, no reinforcements, open deployment for the scum forces, enemy troops reduced in number/quality and infiltrators ready to pop up from ambush. I set myself the goal of taking down at least one character before the rebels murdered everyone.


The game used one of my many sci-fi maps. It's worth noting that imperial assault plays very differently in big open spaces, range matters so much more. 


The czerka force consisted of two group of low level mercs (rebel troop stats), 2 elite trandoshans, 4 normal ones, A czerka boss (Elite Imperial officer), two super-battle droids (Elite Stormtroopers with no special abilities) and a landspeeder (E-Web with 8 move and no rapid fire).

As you can tell, i'm making a lot of adjustments to the game to fit the narrative story we are telling.

The Rebels objective was the prison cell holding wookie captives in the top right


The Rebels were led by Hallarn Yarn (bottom right) who was using the Valiant Commander cards. The squad also contained Mark Keel, a Mon Calamari sniper (beside Hallarn) using the Bothan cards, Gouda Cheesa, a Rodian gunfighter (top left) using the gunfighter cards, Gaxx, a Wequey enforcer (right) using the Wookie cards and finally Fenn Signis (top right), using his own card deck and powers.


The rebels started off by kicking open the external barracks and murdering the people inside. I rocketed my landspeeder and Trandoshan's out to face the threat. 


And was suddenly ambushed by Twi'lek saboteurs out of ambush. Turns out the Rebel Saboteur's are really good at scragging things. 


Early on, I had some pressure on Hallarn and Keel with a tight group fo four Trandoshan blasting away with shotguns. Good use of Keel's mobility, Hallarn's orders and Gouda's insane short range firepower dealt with that threat.


Meanwhile, Fenn and Gaxx decided to rush the prison complex and were met by gangsters and the battle-droids. 


It turns out the havoc fire and cleave make very short work of tightly packed enemy troops. In a short amount of time, the back of the Czerka forces were broken, but not before Gaxx was wounded. 


The elite Trandoshans rushed to defend their employer, and Gaxx smashed their face in with cleave and multiple attacks. Turns out melee is pretty damned brutal in this game and that the Wookie cards can make you into a tank that deals horrific damage...... I shouldn't be surprised. But this game went from feeling like a real fight, to a murderous blood splattered glee fest for the Rebels in two turns. 


The mission ended with the freeing of a large clan of wookies that were kept prisoner at the facility. In exchange for the transportation of the old, weak and infirm off world, the Wookie leader, Attatark agreed to return and help fight for the rebellion with some of his clan. These Wookies will join the recruitment pool in a few turns time.

That's it for the battle's this round.

As mentioned, from here on in, the difficult goes up. I deliberately made the first few turns easier because I know the games a lot better than my players. In story terms, it also represents the empire being unprepared in the sector for rebellion, but the loss of Wookie slaves, a training squadron and a STAR DESTROYER, will really wake them up. 
Related Posts Plugin for WordPress, Blogger...