Friday 31 July 2015

"He was the best of us" - Round 3 Battles - Talathen Sector Campaign

The last few weeks have gone a bit slower than expected due to my players being ill, so it's been a while between updates. However, here are all three battle reports from the last two weeks. 

Korvas shipyard raid - Fleet action

The empire has been converting a civilian dry-dock into a military drydock. The implications for the rebellion were quite dire, as it would mean faster turn around time for Imperial ships, and therefore, more patrols in the sector. 

The drydock was also big enough to handle Imperial Class Star Destroyers, and Fleet Command wanted it blown up at all costs. The first attempt, a sabotage run was blown almost immediately as the empire were waiting for them and the operative was nearly captured. Throwing all caution to the wind, Fleet command threw everything they had, and everything they could borrow at the problem. 


As our sector fleet is quite small, everything was a Borrowed Assault Frigate from The Alliance Fleet Command, 3 Cr-90's and 8 stands of Z-95's. 

The objective was represented by the space station with 6 shields. That could take any amount of damage after that point, but would be destroyed on a single critical hit. 

Opposing them was one Victory Star destroyer, and 6 stands of tie fighters.

Sounds like a horrible mismatch right? The rebels were deeply suspicious of the table deployment, of the fact they had initiative when they didn't buy it, and the fact i'd asked one of them to bring his spare gladiator. 


The rebels came in fast, faster than I initially anticipated, and went straight for the objective. Then i revealed the hyperspace markers under the debris fields and deployed my gladiators behind them using hyperspace assault. 


A classic tactic, with one massive flaw. I brought them in too slow, so they got one round of shooting before the rebels darted away from them. 


However, in that one round I annihilated one Cr-90 and badly damaged the Assault Frigate. The Captain of the CR-90, Anto Salamon, went down with the ship and was presumed dead.

Although recent information suggests he was captured alive. Poor Imperials, Anto is known for being a pompous arrogant jerk and will no doubt regale them with stories of how the Rebellion will be diminished with his loss, as in his mind he "Was the best of us". 


Things look grim for the rebellion until turn 3, when the whole mission changed on a single dice roll. Taking his pile of red dice, Airen Cracken commanded the damaged assault Frigate to open up on the drydock. And in one volley of fire, all 6 shields went down. The Imperials were very concerned, until his second volley failed to produce the kill shot.

However, two CR-90's were rapidly moving into range, and a volley of turbolaser fire from those two ships produced the critical result needed for victory. 


Slow to respond and turn, the Imperial fleet could do nothing to stop the high speed rebel force from disengaging victoriously. 

This was probably the best mission of the campaign, as it felt like the rebels were doomed when the Gladiators appeared and ripped into them, but they stuck to the plan, kept on moving, and punched a whole through the defences, killed the target and fled with the loss of only one ship. 


Stealing Fighters - Ground command assault on Zenith Storage facility


This mission took place at a hidden hangar facility near the polar icecap of Zenith.

The Alliance received intelligence that a small number of Republic era fighters and other contraband was being stored in this hangar.

The plan was to infiltrate a special forces team into the base, clear the way of resistance and escort pilots to the fighters and have them escape with them.

This was our very first "two-part mission", as we also played out the escape from the planet using X-wing.

The same special forces team participated in this attack as the last Special forces report.

It's worth noting that the picture above is at turn 4 (I forgot to take pics earlier). By this time the rebels had got very busy and had gunnerd down a rather high number of Stormtroopers. 


Yep, 13 models taken out in the first 3 turns. That's some busy killing going on. 

The Special forces team split into two groups. Hallarn (Commander), Keel (Sniper) and Fenn (Himself) acted as a firebase, coming in from the north entrance on turn 1.

Gooda (Gunfighter) and Gaxx (Wookie) come in through the side entrance on turn 2, with the pilots following behind them on turn 3. 


Virtually every shot was a kill by the rebels, it was uncanny. I expected the sheer number of troopers to slow them down, but it really didn't. And while I managed to wound two characters, this mission never looked like it was going to be anything other than a rebel victory after turn 2.

I cam quite close to killing/badly wounding Fenn When he didn't take into account my officers moving the E-Webs and their double shots. But ended up 2 points short (The amount his new armour protected him by.....)

The conclusion from this battle is a minor rules change. Due to Rebel characters being able to heal themselves easily when the pressure is off, I am changing the "no reinforcement" option to "delayed reinforcements" for Imperial Assault.

The Rebels got all their pilots to their ships, picking up 9 Y-wings (including a couple of the version with locked forward turrets) and a surprising 3 X-wings. In Addition, the astromech droids assigned to the ships had been left installed and had all developed unusual personality quirks. (Each of the unique R droids for X-wing was unlocked as a unique card) 


Stealing Fighters - Space Combat with new fighter squadron

This mission wasn't for high stakes, it was like a "bonus round" for the first 3 rounds of the campaign (the first quarter if you would as the campaign will last 12 rounds............ oh wow...... John Cena reference).

The Rebels massively outgunned the Imperials, and the idea was a mini-competition to see who could kill the most Tie-fighters.

Each player got 2 identical ships from the following options, once one option was gone, a player had to pick another, and they picked in "reverse glory" order


  • Grey Squadron Y-wing with Ion Turret
  • Gold Squadron Y-wing with Ion Turret and Proton Torps
  • Rookie X-wing with Proton Torps
  • Gold Squadron Y-wings with blaster turrets locked in forward position. 
I preplanned the Tie Fighter squadrons moves before the game. Fly forward on turn 1, turn in on turn 2, and cross on turn 3, k -turn back on turn 4.


Very tidy formation playing if i do say so myself. 

Still, the idea was to give the guys a final "hit-out" for this section of the campaign, let them experience the new fighters (and cheer for making the Z-95's obsolete).

Final kill totals


Luxon Militia (X-wings)  - 3
Basra Consortion (Y-wing variant) - 3
People's movement  (Y-wing gold) - 2 
Republicans (Y Wing Grey) - 0

A 2 to 1 points differential in a game makes for a really funny and quite different experience. 


Round 3 will conclude with one and a half roleplaying session, followed by the end phase. Then the campaign will take a break for a month or so. 

Sunday 19 July 2015

Mansions of Madness - The Monsters complete

Mansions of madness is a unique game. Its mix of dungeon crawling, horror themes, exploration and unique scenarios, make it a really different experience to other games, and I feel it is the Arkham series game that best captures the feeling of the short stories. Usually, you cannot win by fighting the monsters and the game is best played when the investigators hurriedly run around in a panic to desperatly stop the horror before it overwhelms them.

And as you know, I paint my boardgames just to make the gaming experience cooler. My mantra with boardgames is to paint them well enough that they look ok on the table, but simple enough that it doesn't take a lifetime to paint. After all, they are paying pieces first and foremost.

However, for this project I had an extra set of criteria. Monsters in mansions have little data cards that you are mean't to slide in and out when you deploy a new one, as each card has different stats and specials on it. I find sliding those cards a pain in the butt, so I wanted every single monster in a group to be virtually indistinguishable from the others. 


Note, I left the Mansions monsters box open and they got dusty. I'll sort that out at some point. 


Take these maniacs as the first example. Yep, they are in a slightly different body position. But I did my absolute best effort to make sure the models looked as close as possible, right down to the blood spatter. 

Also, another plug for GW's "blood for the blood god", it's simply the best "blood" material i've worked with in painting by miles. I love how it looks on the denim jeans, as that is how blood looks on jeans. 


The cultists were painted as identically as possible. Normally I mix up race in my models, as I don't like seeing a swarm of white dudes only in all my games. But the setting, and the concept of "matching" didn't really work this time around. 


The Shoggoth's got fully covered in a glossy sheen, but asides from that, they are basic black with a tiny bit of highlighting. The eyes are only real "painting" on the figures. It goes to show that even minimal effort can yeild fine looking models for table top play. You don't need a golden daemon sword quality figure for a boardgame to look a lot better. 


I'm so so on these guys, but i'm really happy with how the human heads turned out. The key idea for the monsters, along with "matching" was to make them colourful and easily differentiated from other monsters. This is why I went with quite a vibrant colour palette over the whole series. 


Of course, to balance out those bright colours, other figures got more homely looking schemes. The nightgaunt's in particular, are mentioned in the stories as being featureless. So i thought painting them a dull grey would work. 


The zombies were another large batch that needed to match. I used some of the GW corrosion technical paint to give them a dirty look as well. A hate how they are all waving like gormless fans though. It's not a pose I would have chosen for them. 


The wizard was my least favourite model in the range. He's just a bearded dude standing with his mouth open. I wanted him to be a little bit cooler, so I custom made some tentacles and put them growing out of his mouth. This way, instead of standing there gormlessly, he looks like he's about to explode and become a Dark Young. 


 Finally, my favourite models in the set, The Dark Young and the Crawling ones. The Dunwich Horror itself is an odd figure, the face and the tentacles are kinda cool. But the Dark young is such a nice figure, it feels very solid, as the plastic they use is a bit floppy on thinner parts like arms and weapons. He's just a big ball of awesome. 

The crawling ones had more effort put into them than many of the other figures, because i like them so much. I used wet-blending on the torso to tentacle section, so it looks like the humanoid torso is organically growing out of the sludge at the bottom.

Total paint time for these figures was low, and the key was making them functionally good, rather than works of art. Virtually anyone can paint to this level with a small amount of practice. So I say again, don't be dissuaded from painting your games, even an average to mediocre paintjob is 100 times better than bare plastic. 

Saturday 18 July 2015

Round 3 - A hero falls - Talathen Sector Campaign

The rebellion has had it's first real tragedy on the conflict, with one the of heroes of the rebellion falling in battle. There was much wailing and sorrow, and glasses raised in honour of their fallen comrade.

Round 3 - Planning Phase


No major changes occurred in the "job review phase" and the command team looked the same as it did on turn one. I suspect this will change in the near future. 

Logistics Phase


We tested the new logistics system, and it seemed to work pretty well. Even though i forgot a couple of the rules. A few more tweaks will be made and I'll publish the full rules and card set for it shortly.

Logistics managed a good haul of resources, enough to easily power the planned operations this turn. Here is the new board that includes manufacturing.


At the end of the round, the rebellion now has 1 production in all resources asides from Covert Networks and Safe Transports, and income is 8. I made some tweaks and gave them additional resources to make the system work.

Smuggling was a mixed bag. Roark managed to make a safe run to Naboo for supplies, Gran Dravis failed in his mission and was wounded (after losing some fighter escorts) and Oledeshu failed as well, before rolling the "snatch victory from defeat result" on the fail dice.

So with enough resources to plan out our attacks, we moved onto the next phase


Intelligence Phase

A concerted effort was made by intelligence command to get as many intelligence points as possible for this turn to support combat actions. Both Nibb Nibb and Sly rolled well, generating a whopping 16 intelligence points.

Ged'Ruh was sent on a sabotage mission at Korvas, which was a trap. Resulting in a failure. Intelligence spent intel points to reroll the failure dice, and he ended up escaping unscathed.

Diplomacy Phase


The diplomatic core tripled in size due to new postings, meaning Lianna isn't working alone anymore. She successfully established ties with Solitude X and Gidd Lonn did the same for Cahn. The results of these new diplomatic ties will be mentioned in the end phase.

Our friendly Ithorian hippy force user, Jah, was sent to meet with a mysterious contact who had hacked into Alliance communications networks. He successfully met with this individual, who has maintained absolute secrecy, speaking through droids only. He has arranged a "conference call" with the leaders of the rebellion so that this mysterious source can explain why he wishes to ally himself with the republic, and why he is being so secretive. 


Fleet Command

Hearing of Ged's failure to knock out the Drydock at Korvas, Fleet Command decided to go with the backup plan. Hit the Imperial fleet facilities with everything they have, and some borrowed ships. 5 points of fleet favour were spent to obtain the services of an Assault frigate, and 8 stands of Z-95's and 3 Corvettes sent in. 

The rebellion threw intelligence points, and additional resources from logistics to make this work. And the planning roll was...... barely a success. For their efforts, they get to deploy 2nd. 

Squadron Command

Full of Blountism's, fighter command decided to do a very dangerous mission. Blast through the blockade on luxon, hit some imperial ground targets, buzz by the cities to show the flag, and escape.

A reasonable roll on the planning made this very dangerous mission potential winnable. With Initiative, deploying 2nd, and enemy reinforcements cut off. Still, with no less than 6 victory Star Destroyers in system, this was going to be tough. 


Ground Command

Del Kern decided to personally plan this mission after the People's Movement voted to remove him from command and replace him with their man, Hallarn Yarn.

The mission, hit a storage facility on Zenith that is holding old-republic era fighters, rumored to be an entire squadron of Y-wings. The plan requires them to infiltrate the facility, eliminate the guards, and get the pilots to the fighters for them to escape.  Another reasonable planning roll see's the rebels with initiative, deploying 2nd and flanking, and the enemy with no reinforcements. 


Other

Recruitment gained three successes, and wants to recruit Pilots, Smugglers and Fleet Officers. 

Training got 12 points to spend on training skills

R&D got 8 points to spend on Fleet research. 

Intelligence also wants to research other temple sites on Axamar. 


X-wing - The raid on Luxon

This mission was a tricky one, and gave the Rebels some hard decisions to make. While they did their flyby of Luxon easily enough, as they were leaving a group of civilian ships, attempting to flee the bloackade, followed them. 

They could flee at any time, but that would leave the civilians at the mercy of the Empire's fighters, mines and Star Destroyers.


The civilian ships were simply tokens with hitpoints on them. They could only move 2 ahead, or bank 2. Until the Commander gave the "all clear" order, in which case they could move ahead 4 or bank 2. 

Victory points would be awarded if the civilian ships got within range one of the markers past the imperials and escaped. 3 for the GR-75, 2 for the YT's and 1 for the smaller ships. The Imperials only got VP's for killing freighters. 

The mines in the picture were heavy duty anti shipping mines, that would only explode if a large base ship came within range 2 of them. Doing 2 dice damage per range band. What I didn't tell them, is that the Decimator could detonate them if it was within range 3 of them as an action.


The rebel fighters raced ahead and punched a hole in the minefield, but the decimator detonated one they didn't kill, taking out a headhunter and badly damaging another. At this point, the star destroyers began closing on the escapoe channel, represented by a pair of "targeting icons" from one of the large ship expansions. They started from the board edge, and moved in one range band each turn. (3 dice attack against anything in range)


The Rebels "broke and attacked" in an attempt to direct fire onto themselves and break up the tie formations. 

In previous battles, the decider had been the concussion missiles on the headhunters, but in this battle, they were a non factor.

It was at this point that Blount was shot down by Imperial fire.


With the rebels slightly scattered, the right Tie squadron focussed on the YT-2400 and destroyed it. 


From here on in, the rebels were outnumbered, and the focus became clearing lanes for the freighters. 


It's worth noting that in this scenario, the Imperial's couldn't block the freighters movement, we used "Armada" style rules that allowed the player touched to move out of the way. We figured it was better than just "blocking" and it made the Empire have to focus fire. 

It all came down to last round, as the Empire fired relentless on the GR-75 as it tried to escape. It limped accross the line with 2 damage boxes of its 13 left. 


And while the rebels won 6-3 in victory points, they paid a heavy cost. 5 Z-95's shot down. And when we made the casualty rolls for those pilots, Blount rolled last. 


Blount rolled a despair, which results in final character death. Blount was a real character in the campaign, a reckless foolhardy squadron leader who would shout "Damn the torpedoes, full speed ahead". I guess this means in our game reality, he won't be the door gunner on the Falcon at Endor. 


Thursday 16 July 2015

Round two end phase - Talathen Sector Campaign

Well, we reached the end of round two and have started on round three.

The map is updated on the right, and you may notice a 4th influence colour, as a new, as yet unknown faction has appeared on Nimbala.

Mission reports


The Boneyard - Cresh squad has set up there and encountered pirates involved in a scavenging operation. Initial intelligence suggests that are looking for something of value in the boneyard.

Selano -  Rebel Operatives sucessfully bombed the site of the imperial base construction. In response, the Empire has given up building the base on the ground. 


Deep Space - The Rebel Fleet engaged two Victory Star Destroyers on a training mission. The Fleet managed to destroy one of the Victory destroyers before the other escaped. No casualties on the Rebel side, this victory has left the Imperial Fleet stunned.

Fraxan - Rebel fighters ambush a training flight at the Imperial Flight school on Fraxan, inflicting heavy losses. Imperial flight school is later relocated to Talathen Prime. 


Nimbala - Rebel Special Forces conduct a long campaign on Nimbala against Czerka assets. Esh and Besh squads are involved in different missions against Czerka infrastructure and liberating slaves. 

Axamar - Aurek squad discovers giant walking mountain monsters, and sucessfully nullify an Imperial excavation mission to ancient force ruins. 

Others - The Blockade of Luxon continues, the Empire is taking crystals from Sloitude X, A mysterious cargo docked at Axamar station, the Empire is building improved drydock facilities at Korvas and continuing a PR campaign on Talathen Prime. 

End Phase

R&D: Purchased 4 munitions failsafes and 1 engine upgrade. Also spent points on reseraching the "behomoth rock monsters" of Axamar. 

Training: Got 2 rookie pilots, upgraded 1 pilot to veteran, Purchased Tactician, Marksmanship and Weapon Liason cards. 

Recruitment


As head of recruitment, The people's Movement used 10 clout to preview all 6 recruits in this pool. 

First up Lt Telsij, and Excellent pilot and scientist was recruited by the People's Movement for 14 Clout. 

He was assigned as a Squadron leader. 


Gidd Lonn was next up. And while Gidd is an excellent diplomat, he does have some noticeable drawbacks. He has difficult gaining glory for being grandiose and debts make missions against crime groups more difficult.

The Luxon Militia recruited him for 15 clout and he was assigned to be liason with Rebel HQ.
Jah Doza was introduced in Operation Downfall, and is a force sensitive "hippy". A caring pacifist, he has no time for combat operations.

He was recruited by the Basra Consortium for 13 Clout and put to work as the Senior Diplomat. 


Andil Thorne was also introduced in Operation Downfall as the Chief of Staffs personal logistics officer.

A capable, if not flashy officer, he was recruited by the Republicans for 14 Clout and appointed as the new head of manufacturing in logistics. 


Jaina Koral is a capable smuggler, and a passable fleet officer as she comes with her own named CRV-90. 

A deal was struck with the people's movement that allowed the Basra Consortium to procure her services for 10 clout. She was assigned to fleet command. 


Finally, Occuddeshu is an excellent smuggler or diplomat. Outraged with the deal in the previous round, the Republicans and Luxons pooled their clout to drive the cost of her up. 

The People's movement obtained her services for 15 clout and she was assigned to the smuggling pool. 


Glory updates. 

We have a clear leader in Glory, with the Republians on top with 34 Glory. Holding both ground and fleet command has allowed them a steady stream of good Glory results. In second is the Luxon Militia with 30. 


The next update, in the next few days, will include the first battle report from round 3. Where the Rebels suffer their first tragedy. 

Friday 10 July 2015

Idiot burns Warhammer Fantasy army in protest of Age of Sigmar (Video)

Well, I've said some unkind things about Age of Sigmar to my friends and on forums. Mostly revolving around the delibrate efforts not to provide any form of balence to the game and the silly childish rules around dancing and staring contests.

Personally, I think AoS will make or break GW and I am interested to see how it works out. It looks like it could be a fine game for casual play between friends, if a little shallow for anything else. As a product, that's fine, not my cup of tea as I prefer my casual games to be a bit cheaper and require less effort (see Smashup), but I get the appeal it will hold for others.

But I quit Warhammer Fantasy a while back, and do you know what I did with my army? I gave it away free to a friend who was looking at getting into the hobby. I gave him 3000 points of vampire counts and said, "I ain't using them, you might as well have fun with them".

I also did this with my 30,000 point epic army, hadn't played in nearly 10 years, split it up and gave it to two people who still wanted to play (it was half marines/half imperial guard)

What I didn't do was set fire to the models while ranting for 20 minutes about Games Workshop.

Seriously, this is arguably the most infantile response I have seen to Age of Sigmar. Don't like the rules or that Warhammer Fantasy is being written out, that's fine. Sell your figs online and get some of the money you sunk into the hobby back, play old editions, get kings of war and play that, or just park your figures in a box in case Warhammer Fantasy makes a return later as a deluxe version of Age of Sigmar. Who knows what the future holds for that line.

Burning your models won't teach GW a lesson. They already have the money you spent on those figures. The only person losing out in this is the person burning the figures, hundreds of dollars up in smoke. 


Skip to 8:49 to ignore his jabbering and watch this idiot literally burning money, in a protest, that no one will give a shit about.

It's his right to burn those figures, but the only message he's sending is that he's a spoiled douche clown.


Thursday 9 July 2015

You can't beat shopping locally

New Zealand, land of sheep, gumboots, and international shipping times and costs that will do your head in. 

I shop all over, i'm not hooked into one supplier for my product. I'm a bit of a finicky and fickle customer, who will impulse buy some things at too much cost, or other times with bargain hunt for the right price. 

Book depository had been killing everyone locally on pricing for fantasy flight games materials for quite a while. Sure, it would take a few weeks to get here, but the shipping was free. 

But recently, that service has become increasingly erratic and unstable. Shipping times have dragged up from 10 business days, to 20 business days or so, and that's after the take up to a week to process the order. 

A month is a long time to wait for goodies. 
Book depositories system of "shipping" at work

I've now lost two items in the post from book depository, and the most recent one is now out of print. So nearly 6 weeks after making the order, I got a refund and no item.  


Now there are other international stores out there I buy miniatures and boardgames from, Miniature Market and Warstore. Both become quite cost affordable if you are making an expensive order of small items, say Warmachine figures or X-wing models. Big boardgames, like the Armada core set are just not cost effective to buy from them due to the shipping costs.  

Service and shipping times from these guys is a lot better than book depository, but I guess that's the difference between free shipping, and actual shipping. 

Which brings me back to the initial point, "You can't beat shopping locally".

Being able to walk into a local store and just pick up the product and buy it is really worth it, and the more I think about the weeks waiting for products to be delivered, the more I just think "sod it, i'll buy locally"

And this is the real shocker to me. The local stores prices aren't that bad these days, I guess I was so used to Wargames supply and how pricey they were, but Cerberus, our local gamestore, has relatively reasonable prices, perhaps 20% more than buying online. 

But the real standout is the local online sellers, When I got my refund from book depository, I went to Seriously Board to compare prices and it's virtually equal to Book depository. I also checked Gamesandhobbies and they are right there on price as well. You could shop with either and do alright. 

Take the Victory Star Destroyer for Armada, $59.68 on Book Depo, $59.99 at G&H and $54 at Seriously Board. 

Similar story with the Netrunner core set, $59.68 at BD, $62.47 at G&H and $62 at SB. 

It's there or thereabouts with prices between individual items, but certainly not worth the difference in time to delivery. 

The difference is shipping costs, but those are never more than $7NZ at SB and G&H give free shipping over $99.


Either of those options is preferable to long wait times, and you get to support local businesses as well. 

This little revelation has made me think, "WHY HAVE I BEEN WAITING A MONTH FOR SOMETHING TO NOT TURN UP WHEN I COULD HAVE GOT IT FOR THE SAME PRICE AND DELIVERED IN TWO DAYS!!!!!"

And no, i'm not being paid to shill these companies. I've never actually purchased anything from G&H, although I have several friends who speak highly of them.

I'm just slapping myself for not looking closer at local suppliers when making my purchasing decisions and i'm passing that advice on to you. 

PS, for comics, it's never changed. Mark one in Hamilton is still the king of that niche and a great local game store in general. Cerberus is Wellington is getting there as a local boardgame store, and Jambo in Napier is a good local store as well.

Wednesday 8 July 2015

Talathen Sector goes international!

One of the most humbling experiences you can get when you are gaming, is being told that what you're doing is so cool, people want to join in.

When I started posting about the Talathen Sector campaign, I put up reposts on a few places, including boardgamegeek and the FFG official forums.

What blew me away was people taking the setting and using the campaign to play their own games. It's just a really unique and cool feeling to be able to have other groups, over the world, playing games and sharing in the experience.

It also adds an additional element to the campaign, as their are events happening outside of my, and my players control. It's also been neat to bounce ideas back and forth, i really don't want to "tell" anyone how to play, so I just add some guidance to their ideas so that it feels more inline with the setting, and sit back and wait for the results.

My players also think this whole thing is awesome. 

So far, we have three additional groups joining in. Run by Rortharr, BMFS, and Killdear, all from the FFG forums. (Continuing my policy of never using real names in blogposts, we shall refer to them by their forum handles). We've assigned unit names in the star wars language to keep the teams different in my reporting. My group of players for the RPG segments is Aurek squad. 

Rortharr has run a raid on Fraxan to rescue a captured smuggler, and a mission set on Nimbala. We call his group Besh squad.

BMFS's group has setup a base on a crippled clone-wars era republic destroyer in the boneyard, and is dealing with pirates. We call this group Cresh Squad.

Killdear's team is about to kick off their missions by running the 
Perlemian Haul campaign. This will be Dorn Squad. 

I've included two of the mission reports i've received so far in this post. One from BMFS (don't turn on the lights) and one from Rortharr (Nimbala High Noon)

Enjoy! 


--------------------------------------------------------------------------------

Clearance – Secret
Mission – Don’t Turn Out the Lights
ID: KSR – 000001
Reporting Officer: Kinsa Galor

Status – Mission Successful
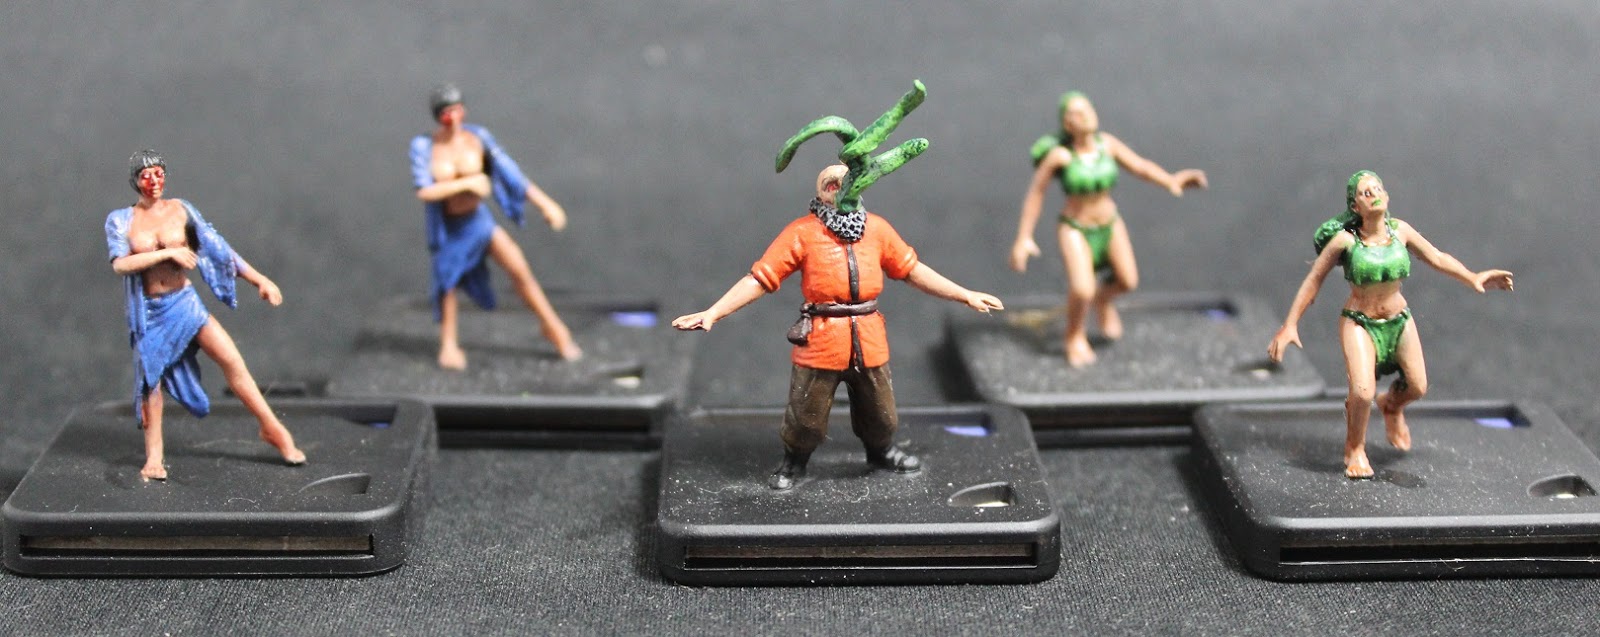
Cresh Squadron

Teg Ulster, Commander/Commando: Teg is a human male and the natural leader of Cresh Squadron and the longest serving member. He was private security on planet [DELETED] for some time before being ran off and seeing the Rebellion as a last chance. He maintains the belief that all soldier under his command are always more important than any mission objective. This strength may also manifest as a weakness and requires constant observation.

Zolaran Feist, Engineer/Explosives Expert – Zolaran (Zol) is a human male from Toprawa and the second longest serving member of Cresh Squadron. He shows a particular fondness for explosives and for executing captured Imperials. This has lead to many confrontations with Teg and while their comradeship on the battlefield is notable, they are not friends. Recent actions on Toprawa have cost Zol an arm, hearing in his subservient ear and the life of his sister at his own hand. Observation and mental evaluation is required and ideally he should be pulled from the front.

Gywn Ulster, Sniper – Gwyn is a daughter of a [DELETED] a Toprawan village leader and Rebellion sympathizer. She was married to Teg following a proposal that was more accidental than on purpose. While she is not sympathetic to the Rebellion, she is loyal to Teg and is not considered a risk at this point.

‘Iggy”, Medic – Iggy is a retrofitted IG-86 assasin droid with 2-1B medical droid parts and programing. Currently this unit is status unknown after seeking revenge for an intrusion on his programming that cause him to murder three innocent women on Toprawa. His loyalties largely are with his friend Byg’Dyrty and should be watched for signs of further hostile takeover attempts.

Byg’Dyrty, Agitator – Byg’Dyrty is a Twi’lek recruitment and destabilization agent for the Rebellion. Currently his status is unknown as he is assisting Iggy. His past is questionable at best but his worth to the Rebellion as an individual and by virtue of Iggy should not be understated.

Wrrladdik “Otis”, Marauder/Beast Rider – Wrrladdik (Otis) is a Wookie and the newest member of Cresh Squadron. He comes by way of an old contact Fro’Kazza who owed a life debt to Teg but left with Teg’s blessing to free his clan from slavers. Otis does not speak or understand Common but has accepted a transferred life debt from his cousin Fro’Kazza to watch over Teg. His loyalty to Teg is without question and likely nonexistent to the Rebellion. That said, Otis does seem to wish to provide stolen/capture supplies to Rebellion fighters.

Pre-Mission Preparation

Cresh Squadron evacuated Toprawa and after several days in transit arrived on the MC-80a Mon Calamari Cruiser Cathleen for a time of refit and rest.

Actions aboard included meeting their old supply contact Hoppa (Jawa from Tattooine, sees all humans as the same and claims to run the Cathleen) and requesting new supplies due to their recent hurried evacuation of Toprawa and continued success for the Rebellion.

Departure

Cresh Squadron departed Cathleen with the member of Teg, Gwyn and Otis. This was a shock as Teg found out that Zol had left the ship for an opportunity working with and training other Rebellion spec ops teams. There was no formal goodbye as Zol felt it was unnecessary.

Otis boarded the ship speaking to Kinsa and waited for Teg confirming he was the target by holding a holo image against his person. Otis later extended the life debt to Gwyn as a member of Teg’s clan.

Enroute Cresh Squadron read sector information on Talathen and a brief description of the Boneyard destination.

Arrival

Cresh Squadron arrived in the ruins of a Venator class ship currently used by the Rebellion as a base of operations within the Boneyard. Upon arrival they were told to acclimate with their surroundings and prepare to receive a briefing. Notably the team was upset with the limited amount of space versus the high number of Rebellion soldiers/staff occupying the area.

Mission

Cresh Squadron was tasked remotely by Jevon Talovar to seek out a replacement generator for the one that was about to expire and currently powering the docking bay and surrounding rooms aboard the Venator. The target hulk was under power and no organized resistance was expected. However, there were reports of pirates operating in the Boneyard but there had been no conflicts to date or a reason to expect any change in this status.

The team was outfitted in space suits from their previous missions in sector [DELETED] against Moff [DELETED]. It was planned to land inside one of the three operational bays on the Venator and move to the opposite side assuming the first generator located would not be active.

The first problem arose upon arriving at the Venator. The shuttle bay was damaged and there was a fear of failing take off procedures. The decision was made to do an EV exit from the shuttle and space jump to the hulk. Teg wisely requested that Otis carry Gwyn and they successfully jumped from the Lambda to the hulk with no serious injuries.

Upon arrival in the first generator store room the door was sealed, likely due to the damages taken in battle. Otis forced open the door and the group came under attack from mynocks that were quickly dispatched with no injuries. However, the generator inside proved to be non-operational.

Cresh Squadron then moved through the ship avoiding twisting bulkheads and other debris. Upon arrival at a critical junction they encountered an armed pirate group moving through the ship.

Teg immediately ordered Gwyn to open fire, something that was done reluctantly and a fight ensued. The pirates were all killed except for two that fled from the situation and Otis proved especially devastating in zero G combat with his vibro spear. The team took some time following the encounter to patch suits in fear of the vacuum and Otis retrieved two working heavy blaster pistols, CH-16a designs.

Kesh Squadron moved on and upon arriving through a set of bay doors located a large pirate operation that was retrieving some sort of cargo or salvage from the ship. Despite getting the drop on this group Teg ordered a hold fire to survey the area. During this time a heavily armored leader approached the group. He asked what they were after and when the generator was brought up he offered it if the group would not bother his workers or operation.

It was apparent the pirates were approximately platoon strength with an uncounted number of labourers that were likely slaves. Teg accepted the arrangement with the pirates, while trying to subtly view the cargo with no success. It should be noted that a large capital ship was seen moving under power in the distance. Eventually the group retrieved the generator and moved back to the original docking bay.

The shuttle was held close to entry and the group loaded the generator, returned to base and had it installed as well as giving the group of rebels the two CH-16a’s. Jevon Talovar was happy with the results, pleased that they opted to not start a conflict with the pirates (although curious about the cargo) and told them to wait for new orders.

Officers Recommendations

-          Land engagements should be orchestrated by Teg as he is reliable at achieving the missions as written and directed.
-          Flexibility is no the teams strengths, often rigidly adhering to operational guidelines.
-          Otis is to be watched in future pirate dealings, had he known there were slaves the meeting may of turned violent.


-----------------------------------------------------------------------------------------------------------------------------------------------------------------------------------------------------------------------

Nimbala High Noon


The Mission

The Empire is not happy that their best link to the rebels in this sector was stolen out from under them, especially considering the damage done to the base in the process. With Imperial heat rising, Besh Squad has decided to hit an Imperial affiliate, the Czerka mining operations on Nimbala, to steal raw materials to sell or use in manufacturing, mining tools that could be repurposed as weapons, as well as explosives for use in, well, creating explosions where the Empire doesn’t want them.

Dramatis Personae:

-Pash, a Human from Selano with the Resource Acquisition Duty. Pash was a smuggler for Kooban Haalu, until he betrayed Pash to the Empire to cover his tracks. The Rebels rescued him as part of a prison break and they have become his new employer.
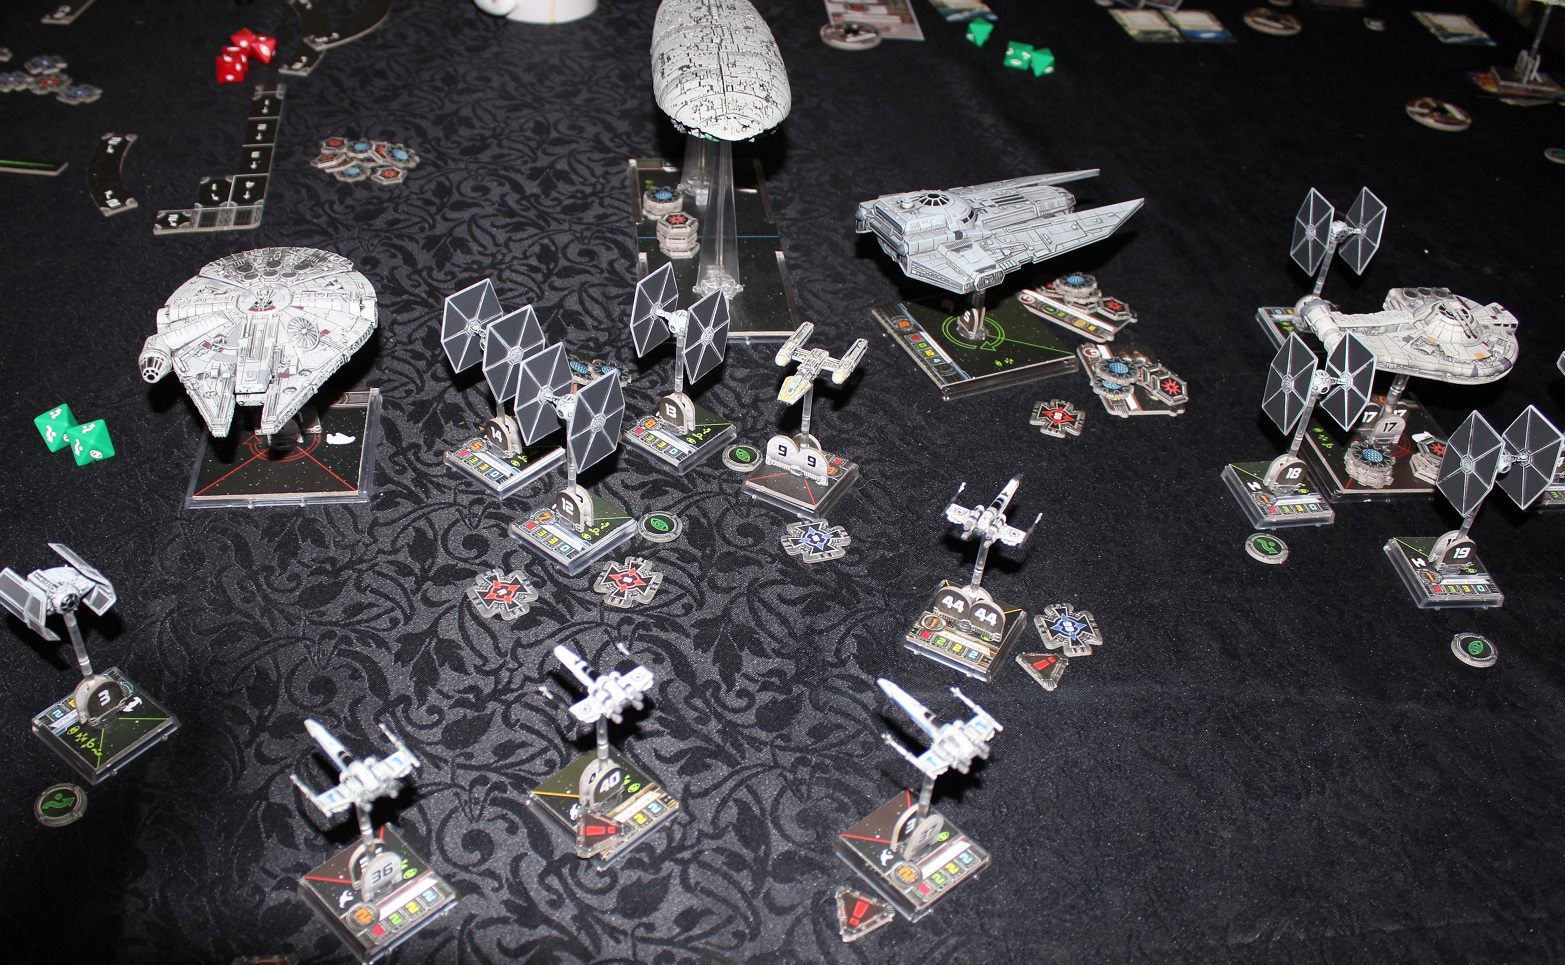
-Zal, a Human from Talathen VII with the Space Superiority Duty. Zal joined the Rebellion to experience the thrill of dogfighting, and has become Pash’s occasional copilot.
-Oskara, a Twilek from Nimbala with the Sabotage Duty. Oskara joined the Rebellion after her sister died from an illness created by Czerka mining of her homeworld, which could have been cured if the Empire had provided basic aid to the planet’s inhabitants.
-Jin-Rio, a Human from Zenith with the Recruitment Duty. Jin-Rio escaped a crackdown on anti-Empire sentiment at Zenith Academy and has vowed to restore democratic government to the galaxy.

Prologue: Seeing a Man About a Mining Laser

The team landed Pash’s freighter, the Star Angel, a safe distance from the Czerka facility they had targeted for robbery and instead arrived in a hijacked Czerka airspeeder, posing as an inspection team. Some forged transmissions from headquarters meant the team was able to land and gain entry without issue. Once inside, Pash launched into his routine, keeping the staff so distracted by constant conversation, questions, and nitpicking (rolled a Triumph) that he was able to buy Jin-Rio some time when she got caught sneaking into the storage area. Jin-Rio was able to evade pursuit and get the supplies from storage, and then led the Czerka security on a merry chase. With the facility in confusion, Pash seized an opportunity to take control of the situation and mislead the security response, giving Jin-Rio an opening (with the covering fire of Oskara and Zal) to get the supplies on the airspeeder.However, she took a bad hit (a nasty Critical off a Boost die in the guards’ pool) as she was moving the goods. Pash followed her onboard and they zipped away, heading for the ship. The Force had other plans.

Part I: Sanctuary

Only a few moments after escaping the Czerka facility, a bad storm brewed up. The airspeeder was forced down, and it was obvious that even if the team could reach the ship, they wouldn’t be able to take off until the storm passed.

Concealing the airspeeder in the foliage, the team saw evidence of a village in the near distance. Though the trek through the jungle was rough (Oskara’s home field advantage wasn’t enough to surmount the difficulty of moving through a thick jungle in a bad storm) they eventually reached what turned out to be a Twi’lek village.

Oskara took the lead in speaking with the villagers, barely overcoming their distrust of outsiders and convincing them to let the team enter and have someone see to Jin-Rio’s wound. This was how the team met Belandi, a pacifist Mirialan healer who had made her home as a healer living among the Twi’leks (I plan to introduce the Force and Destiny Beginner Game characters as GMPCs, who the players will hopefully successfully recruit to the Rebel cause). Belandi had few medical supplies, but proved remarkably capable and was able to stabilize Jin-Rio’s condition.

While Belandi was busy with Jin-Rio, Oskara, Pash, and Zal tried to convince the village leader to let them pass the storm in the village. Oskara tried to appeal to use her status as a fellow Nimbalan Twi’lek, Pash tried to leverage Jin-Rio’s wound, and Zal made veiled threats. Nothing was able to sway the leader, until Jin-Rio emerged from her bed and a runner entered to tell the leader that the Czerka tax collectors were on the way.

Jin-Rio was able to convince the leader to hide the team until Czerka was gone. Stuffed into a hollow portion of the wall, the team watched as Czerka thugs beat villagers and extorted them for money, then stole and damaged property when the Twi’leks couldn’t pay up. It was too much for Oskara, who (against Jin-Rio’s insistence they not get involved) emerged and stood up to the collectors. She was outnumbered, but Pash and Zal decided to back up their teammate and opened fire. The three of them made short work of the Czerka thugs, but the village leader told them that now more would come, to seek vengeance.

Part II: Nimbala High Noon

In the aftermath, Jin-Rio tried to rally the villagers to defend themselves against Czerka. The speech was failing, until Oskara launched into a passionate speech about the need for Nimbala’s Twi’leks to stand up for themselves at last (Triumph on Leadership check). While Jin-Rio and Oskara trained the villagers, Zal and Pash moved the supplies to the ship. The storm was still raging, preventing them from leaving, but now at least the supplies were secure.

Oskara also went to Belandi, who she correctly guessed had the ability to call on the Force. Oskara tried to convince the Mirialan to join their fight, but Belandi’s strict pacifist code held strong…for now.

The team planned on a two-stage operation: an ambush outside the village, and then a stand at the gates. Oskara led some of the villagers to the ambush site, while Jin-Rio oversaw the building of a barricade across the entrance. Pash and Zal lent aid, but seemed content to let the other two take the lead.

(I used the Mass Combat rules from Onslaught at Arda 1 for the battle, giving each player one turn to play out what they were doing during each phase of the fight)

Czerka’s response team arrived, a mix of thugs and droids. The ambush bloodied them, but eventually they had to withdraw to the barricade at the gate. The Czerka administrator leading the attack, Angu Drombb, proved an adaptable commander, and the assault against the barricade nearly broke the line. Belandi continued to wrestle with her inner conflict between helping those in need and remaining true to her ideals.

The climax came when the second push by the remaining Czerka forces broke through the barricade. The players and villagers fell back, despairing, but this proved enough to tip the scales. Belandi emerged from her makeshift clinic and demonstrated the power of the Force, hurling debris into the enemy. Amidst the chaos, Oskara had climbed to the highest roof and drew a bead on Drombb. With one shot, she ended his life. The survivors retreated in disarray (effects of the Triumph on Oskara’s combat check). The storm cleared shortly after the fighting ended.

Epilogue

Oskara was able to convince the Twi’leks that only by aiding the Rebellion could they ride Nimbala of Czerka. Some Twi’leks left with the team, to volunteer their services to the Rebels, while others pledged to spread the revolutionary message to other villages. Others seemed willing to take the fight to Czerka itself, if they could be given weapons and more training.

Jin-Rio, meanwhile, was able to convince Belandi that she could do more to achieve peace working alongside Besh Squad then she could in exile on Nimbala. Belandi joined Besh Squad as a capable medic and Force user


Related Posts Plugin for WordPress, Blogger...