
After rolling a lot of sucesses on his planning roll, this was going to be a short and swift action. The empire has been well and truly caught with it's pants down, as the end of round two photo below shows.
I'd like to note that from here on in, the battles will be getting harder. The training period is over, so this should be the last "turkey shoot", unless the players roll exceptionally. From now on, an "even roll" on a planning mission will have them outnumbered and outgunned. it's only fair, they are the rebels after all.

This missions fielded 8 stands of z-95s (3 Speed, 4 shoot, 4 hull, 1 red anti-ship, escort), A nebulon B support refit (borrowed from the rebel fleet), a CR90 and a CR90b vs two Victory I's with no fighter screen. It was never going to be a straight up fight, but I really wanted to test how the empire would perform in from such a terrible position.

The Rebels came in a lot slower than I expected, so by the time we got to engagement range, I had managed to swing both Star destroyers around, and found myself able to target two ships most rounds with side and rear arcs. I didn't manage a single frontal shot in the whole game :(
Splitting formation was a mistake, I should have turned both ships the same way at slightly different speeds. This allowed the rebel fleet to focus fire on one Star Destroyer. The poor guy on the right of this picture.
Accidentally, the Nebulon B crashed into the Victory on the right, which prompted us to go to the "ramming" rules.
As a result, this mission ended in a hail of ramming at point blank and fighter attacks against un-shielded quarters. I find it quite pleasing that I managed to damage each of the rebel capital ships, knocking down most of their shields and forcing some to use engineering orders.

Still, a hopeless fight is a hopeless fight, and when the Victory on the right exploded, it was close to "go-home" time. So I called the mission a solid Rebel victory, even though one Victory managed to jump to lightspeed to escape.
Special forces free slaves on Nimbala
This was another massively successful planning roll, no reinforcements, open deployment for the scum forces, enemy troops reduced in number/quality and infiltrators ready to pop up from ambush. I set myself the goal of taking down at least one character before the rebels murdered everyone.

The game used one of my many sci-fi maps. It's worth noting that imperial assault plays very differently in big open spaces, range matters so much more.
The czerka force consisted of two group of low level mercs (rebel troop stats), 2 elite trandoshans, 4 normal ones, A czerka boss (Elite Imperial officer), two super-battle droids (Elite Stormtroopers with no special abilities) and a landspeeder (E-Web with 8 move and no rapid fire).
As you can tell, i'm making a lot of adjustments to the game to fit the narrative story we are telling.
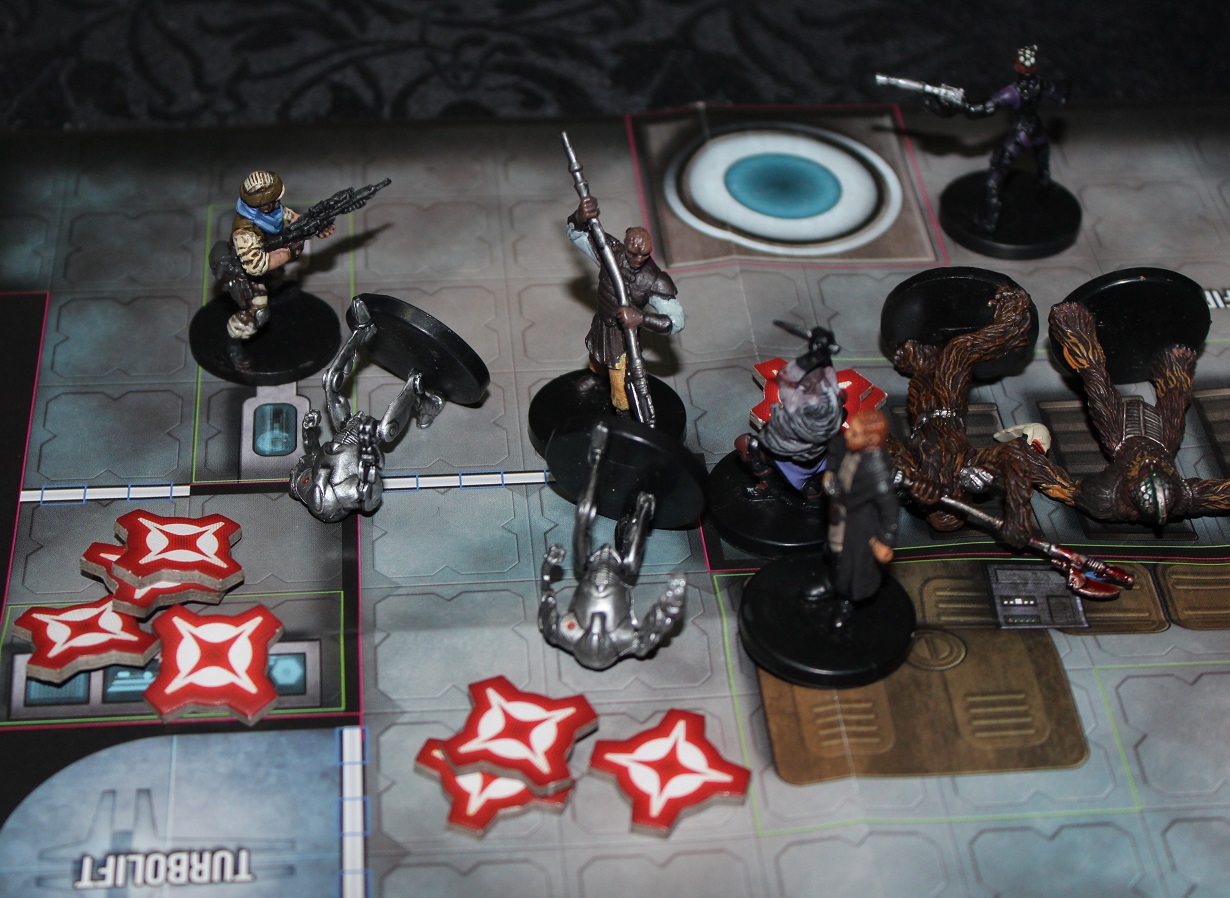
The Rebels objective was the prison cell holding wookie captives in the top right

The Rebels were led by Hallarn Yarn (bottom right) who was using the Valiant Commander cards. The squad also contained Mark Keel, a Mon Calamari sniper (beside Hallarn) using the Bothan cards, Gouda Cheesa, a Rodian gunfighter (top left) using the gunfighter cards, Gaxx, a Wequey enforcer (right) using the Wookie cards and finally Fenn Signis (top right), using his own card deck and powers.
The rebels started off by kicking open the external barracks and murdering the people inside. I rocketed my landspeeder and Trandoshan's out to face the threat.

And was suddenly ambushed by Twi'lek saboteurs out of ambush. Turns out the Rebel Saboteur's are really good at scragging things.

Early on, I had some pressure on Hallarn and Keel with a tight group fo four Trandoshan blasting away with shotguns. Good use of Keel's mobility, Hallarn's orders and Gouda's insane short range firepower dealt with that threat.


It turns out the havoc fire and cleave make very short work of tightly packed enemy troops. In a short amount of time, the back of the Czerka forces were broken, but not before Gaxx was wounded.
The elite Trandoshans rushed to defend their employer, and Gaxx smashed their face in with cleave and multiple attacks. Turns out melee is pretty damned brutal in this game and that the Wookie cards can make you into a tank that deals horrific damage...... I shouldn't be surprised. But this game went from feeling like a real fight, to a murderous blood splattered glee fest for the Rebels in two turns.

That's it for the battle's this round.
As mentioned, from here on in, the difficult goes up. I deliberately made the first few turns easier because I know the games a lot better than my players. In story terms, it also represents the empire being unprepared in the sector for rebellion, but the loss of Wookie slaves, a training squadron and a STAR DESTROYER, will really wake them up.
No comments:
Post a Comment