Showing posts with label Tips and Tricks. Show all posts

Sunday, 23 March 2014

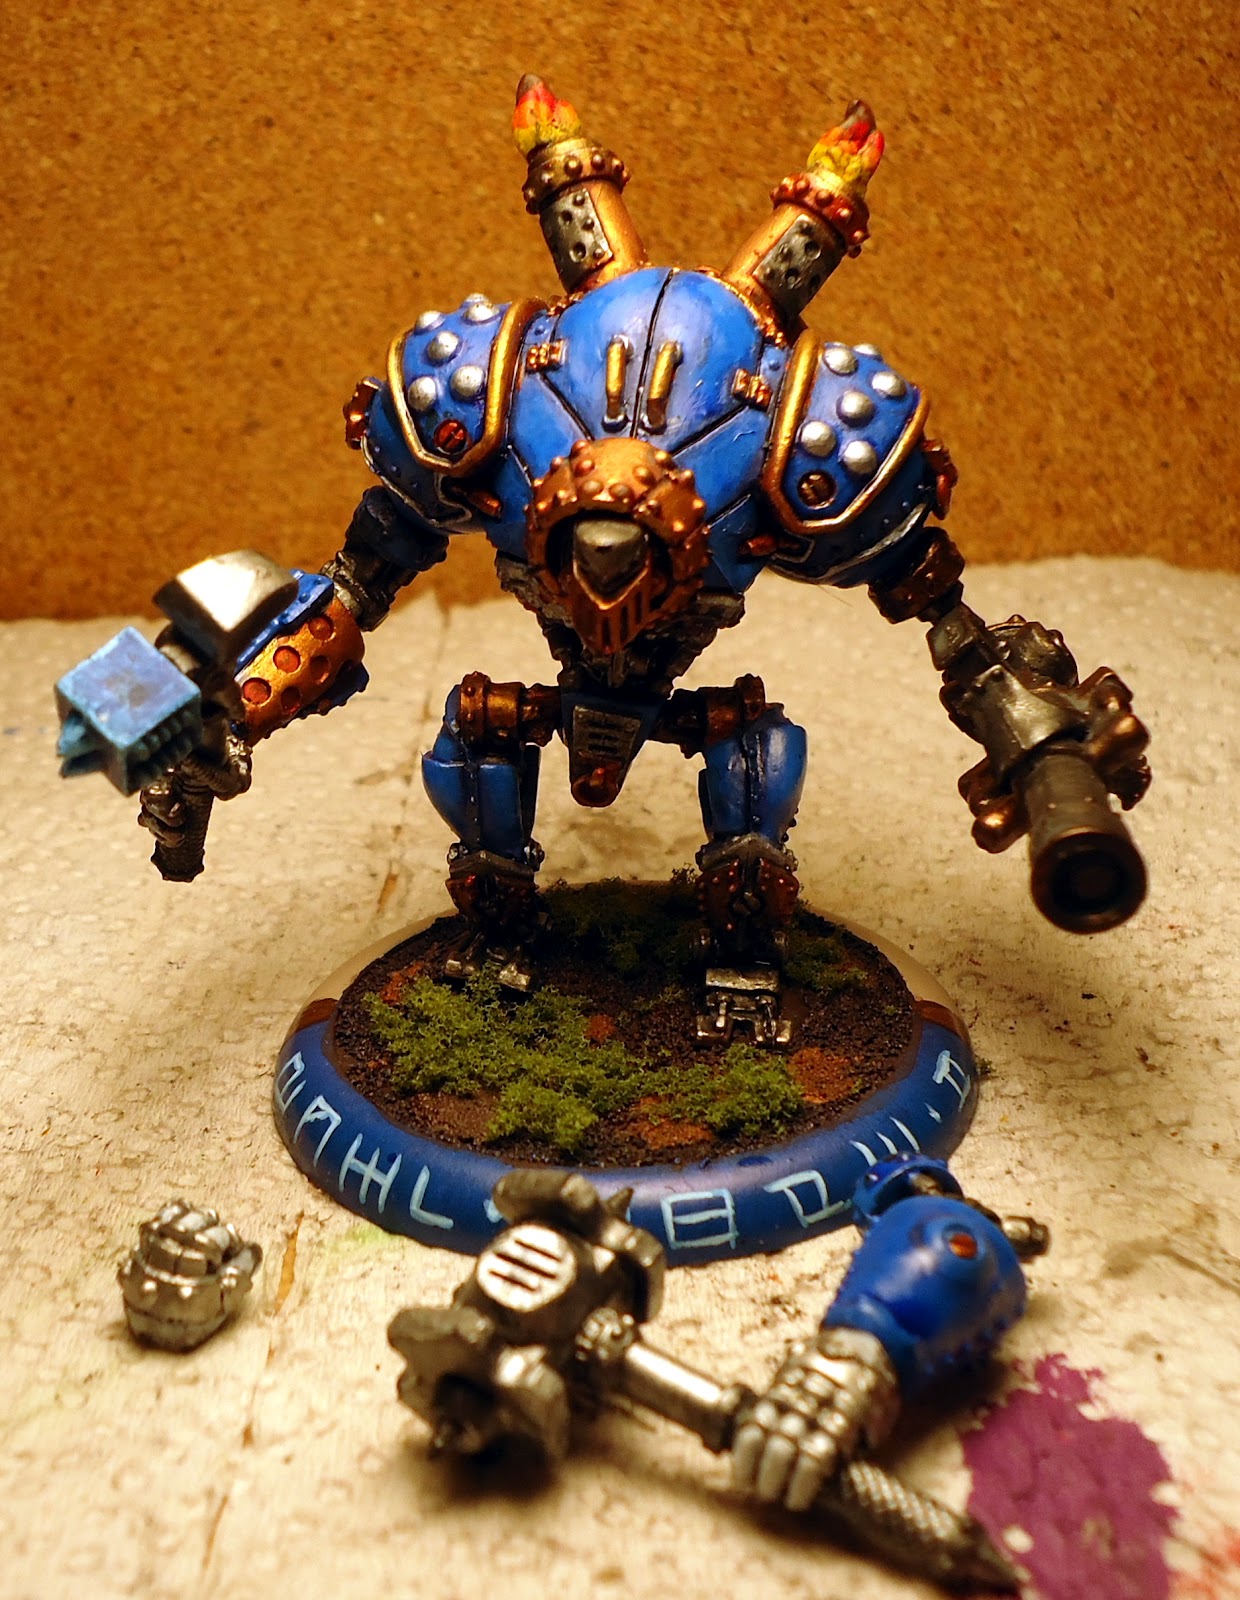
Ol'Rowdy - Fun with flags and gore

I'm pretty darned stoked with how this bad boy has turned out.

I tried some new techniques and some new paints. Damn he looks boss!


First of all, as a character jack I wanted to paint him a little different from my other Cyganr Jacks that are 90% blue. I decided to do him in the same scheme as Thorn and my Warcasters. that is, mostly gold with blue as the 2nd colour. 

Makes them stand out, while still being very Cygnar. 

I also wanted to try out some of the new citadel technical paints. If you haven't seen these yet, go check them out. GW has a bunch of you tube videos about what the paints do and how to use then, they are a little "play school" (Or Sesame street/Blue peter) but they are still quite good short demos of the capability. 

The "blood for the blood god" paint is pretty cool, nice and gloopy and really blood red. I went to town on Rowdy to make him look a bit like a feral monster that has just caved in a warbeasts skull. 

I painted up, in the direction the blood from a blow would be coming. I also flicked blood onto rowdys face and arms. I love how it has dried over the blue sections of the armour. Most pleasing. 

I also used some of the "typhus corrosion" to get a dirty effect on his hands and lower body. 

The other little innovation was to make a banner for Rowdys off-hand. Having his hand just hanging out like that looked a bit dull to me, so viola! Banner!

I'm getting more confident with freehand and would really like to try a proper "art" banner at some point in the near future. For what model, I have no idea, but i'd like to do something nice. 


Coming up on the painting desk, Aiyanna and Holt, as well as Gorman, tempest blazers and Kraye (i need these guys base painted in a week for a tourney! PANIC!!!!)


Tuesday, 18 February 2014

Meg Maples Masterclass - Wellington (Guest post)

One thing i wanted to do more this year was get other people in my gaming groups involved in some guest posts. Our local PP Press Ganger Pelarel posted this originally on the NZ Warmachine blog, Thrallblacks.

Original post is here, http://www.thrallblacks.com/2014/02/meg-maples-masterclass-wellington.html


Or "I've been doing it all wrong!" ;)

No, Meg didn't actually say it but we all quickly realised that we had :)

Saturday started with a lot of sunshine (as usual, Metservice had predicted rain) and 16 painters turned up to learn from the awesome Meg Maples.


Meg supplied the minis, though we did have a choice as to which mini. Bearing in mind this is a class and we'd be learning techniques that we'd never used before we chose...


Steampunk Dorothy from the Guild of Harmony


Boy, did we make our lives difficult for ourselves! Awesome mini, beautifully detailed and posed.. perhaps a little too detailed to learn on, but hey! why make life easy for ourselves :)


After everyone had found their seats and gotten the pre-coffee banter out of the way, we settled down to business and Meg showed us how to prime our minis - yes, we'd been doing it wrong!


With priming, less is more apparently, who'd have thought!


Once we'd all gotten that sorted, we were into base coats. pay attention to the skirt on my mini..


Skin and clothes base colour in place, and apparently sanguine base is a little dark to easily learn the two brush blending technique that Meg was going to wow us with - seriously, we were all wowed!


OMG!!! this was an awesome effect that Meg managed to impart clearly and with plenty of commentary as she worked. Great artist, great teacher what more can i say? The gasps and "holy sh!t"s floating around the room were testament to this, people got it and it was mind blowing! Though, the "holy sh!ts" from those using GW paints may have had a slight edge of frustration to them, eh Charlie? ;). For the 2 brush blending technique Meg uses you need a paint with a longer working time, something that GW paints are not noted for.... Those with PP paints in their collection became very popular..


Through all of the tutorials Meg made great use of discussion on colour theory to tie the steps together. Having the discussion approach gave the colour theory much more context and made it understandable for everyone. Also having a selection of her minis available for reference was a great aid to discussion, allowing topics to wander over to "how did you do this colour", "what technique did you use to achieve this?"..

A view from the naughty table


The afternoon was interspersed with the discussion and eyes and faces.


6 step eyes... yes SIX steps to 28mm eyes!!! oh, and you do the eyes BEFORE you shade and highlight the face... no, seriously, you do cos Meg says and she really is right! (See the continuation of the 'I've been doing it wrong' theme?) the faces continued the 2 brush blending theme and a discussion on skin tones and how to work them through. this was pretty much the rest of the afternoon with lots of "oh my god"s and other exclamations as people got it.


see, lipstick, eyes, eyebrows and a beauty spot! I could not have painted like this on Friday!


Day 2 came along with more sunshine and plenty of light. I have to say a huge thanks to Sue and Heretaunga College for the venue - we couldn't have asked for better!


Metallics, hair, free hand and glow effects were the order of the day for day 2.. with more colour theory!! :)


and, guess what - metallics with 2 brush blending. The choice of shading tones has a real impact on the final effect. annoyingly I feel I did better on the back of the rifle stock than I did on the front but didn't take a pic :(

the hair went a bit better:


I managed to bring out the filigree on the stock and a bit more detail on Tonto.. I couldn't bring myself to tackle the basket of flowers.....


I didn't get around to applying Megs free hand and glow effects tutorials to my mini but I definitely have a much better idea of how to approach them for future projects.


All in all, I was really happy with how the mini had turned out and the techniques that Meg somehow managed to get into my head will definitely stay with me for later work, there is NO way I'm not using 2 brush blending at every opportunity!!


All 16 people at the class had a great mini to show off at the end with everyone learning so much!


For anyone considering asking Meg to run a class you should stop thinking about it and just do it! Organise your fellow painters and get a date and venue sorted, you will not be disappointed. Meg manages to impart so much of her passion and enthusiasm for painting whilst still giving a technically excellent lesson that suits all abilities - you don't have to be a top painter to really step up your game with Meg but already great painters will learn a lot too! Go into the lesson with a willingness to learn, with the odd fun sidetrack and you'll have great time and come out the other end a much better painter for it.

I will be working to coax Meg back to continue her great work sometime in the future - I'll definitely be keeping in touch! (until she un-friends me on Facebook and blocks my email address anyway! ;o) )

Cheers

Chris
PG Palarel

Sunday, 5 August 2012

Stormwall - Complete


Yeah! Look who is large and in charge, its my goddam Stormwall that's who.

This was an epic paint job over a two week period, not as long as you might expect either (I wasnt painting 24/7 by any means). I did learn a couple of interesting lessons while doing this sick puppy and heres my advice for anyone planning on doing one.

Pinning isn't a must. This is 95% held together with just super glue and its been remarkably stable. I only pinned the torso to the hips and one of the arms (The left one, mostly because i'd put the shoulder shield on in an annoying place so the arm wouldn't go flush into the socket).

I also painted it fully assembled and that didn't present too many issues. I either held the model by the base (like a waiter holds a drink tray) or placed my thumb under its groin and another finger on the main smoke stack. (And immediately after typing that word he notices he hasn't done the smoke stacks yet... doh!). The models weight can cause some strain on the wrist after a while though.

The sheer size of the model has its positives and negatives. The massive surface areas mean doing the base coat is really easy, you can be really messy and fast and its still very easy to tidy up as you progress through your paint layers.

The biggest challenge on the model was the areas of white. None of my current Warjacks sport the alternate Cygnar blue/White pattern but I thought it would be great on the Stormwall. With all those big areas you really need something to break the model up so its not just one big blue blob. The white gives the model more space and actually makes it look a little bigger.

The white was done in many layers, starting off white brown, through leather, then bone and finally white. The white was very lightly washed over the joints in the arms and legs to give the highlighting a little more subtlety.

I'm also pleased how well the blue citadel glaze worked on the tesla coils to give them a nice crisp shiny look.

The Stormwall is also a model that lends itself well to weathering effects. A little grime and dirt makes the model more believable and helps break up those massive single colour areas.  I'm very pleased with the mud effects on the feet and knees especially. Nothing looks dirtier than mud flung onto a freshly painted white model. 

And in combat?

Well its been a mixed bag so far. Mainly due to my opponents trying everything in their power to cripple and smash it as soon as possible.

A couple of quick tactical tips I've picked up are.


  • Lightning pods are Def 5 and immune to lightning. Other models can target them with lightning attacks that arc and this is a great way to damage stealth units.
  • Covering fire can go out to the weapon range, but its almost always better to place them about 2" in front of you so people cant go around them to engage you. (That means you tunnelers!)
  • Being in melee doesn't mean you cant shoot. This is important if you in an assassination run and those pow 15 cannons might make a difference between success and failure. 

I'll be taking one to the upcoming tournament and i still don't know what caster i'll use him with.


Tuesday, 5 June 2012

Day Of Paintenenening (Guest post by the Megapope)


Bright was the day and cold the morning when your hero Megapope strode across the Plains of Sorrow and braved the heights of Mount Anguish... no wait it was actually closer to Johnsonville.

The lads and I decided to make the most of the extra day off work by applying some paint to various warmachine models. Naturally I took a camera along so I could document how the minis progressed and also take some pics of daft friends pulling silly faces.


The first thing this trip taught me was that I seriously need to invest in a decent carry case for all my crap. Vomkrieg has a nice fold out silver trunk thing, small enough to sit on a table, big enough to carry his substantial paint collection, brushes, tools, small House Elf servant, etc.

Also not seen: inflatable painting giraffe
I brought along this lot, plus a lamp and other useful things. Enough to be annoying and to take a while setting up, when I could have just operated out of a nice fold out casey thing. BUT NO I WAS A MUG.

So who were the intrepid painting team you ask? GEEK SQUAD ASSEMBLE.

The Millinator paints super slowly but that's okay. He's collecting Menoth!

A man of wealth and taste. 
Smitey. Took him approximately 6 years to paint.
Aaaaahahahaha it says 'SMEG PACKAGE' in the background.

The Five Foot Pole appropriately enough plays hard bitten Dwarven mercenaries. He and Vomkrieg spent much of the afternoon playing a game while Millinator and I lurked inside where it was safe, painting.

"TELL US WHERE YOU HAVE THE PLANS HIDDEN AND THIS WILL GO EASY FOR YOU"
Look at the size of that drill. Look at it! 
FFP's Dwarven Hoard™ in battle!


Vomkrieg has a blog, like a real grownup! Sadly, he has many enemies due to his years as a secret government agent and so opted for anonymity. He plays Cygnar! 

I think his photo is pretty seamlessly done and you can totally tell I'm a designer.

Pew pew! Dakkadakkadakka. Pew!

It may look like a discoball on legs but it packs a mean zap

As for myself, I managed to get my Manowars base coated and inked up. Here's some progress piccies, as well as a couple pics of how Sorscha is coming along. Nobody took a silly pic of me on the day, sohere's an amusing photo of me at the Warmachine gaming club.

It ain't easy being greeeeeeeen

Now with sexy gold and red and boltgun metal

STAGE 3: THE INKENING

Highlighty goodness

The face needs some work...

And that was my long weekend of painting. Yaaaaay. One Juggernaut down, six Manowar and a warcaster on the way to completion and some other things waiting in the wings. Next up: playing some more games and getting my ass handed to me a lot. Whoooo!

VomKrieg - Thanks to Megapope for putting this together and heres a link to his blog..... ignore the URL Warmachine fans, its now all Warmachine .... ALL THE TIME! (or until he gets distracted by something shiny.... like a penny or a puddle)


Next thing for out geek squad is to do more painting, get some terrain sorted, press ganger all our other friends into playing (BOTH OF THEM) and set up our own WARMACHINE DOJO! (CULTURAL APPROPRIATION AHOY!)


I'll be back later this week with some more snazzy shots of my Storm Strider, and Epic Caine PEW PEW


But for now, here's another epic Caine


Sunday, 3 June 2012

Devil Dogs & more

Just a quick recap of what has been over the painting table in the last few months. I've gotten a bit slack on actual painting updates, but here's a catchup.


Sam and the Devil Dogs (With Murdoch)

You are going to have to excuse the quality of the photos, I normally take them outside in natural light but its either been too dark when I've gotten home from work, or raining, or I've forgotten to do so for ages. Therefore the photos are done inside under a lamp..... not so good.

First up, I decided to use an odd palette and mix in as many shades of random metals as I could find. Secondly, I made sure each individual had a slightly different arrangement of colours. Thirdly, I gave same a nice bright jacket and finally I painted murdoch like a trencher.... I also made his skin darker than depicted normally. I can't help but think that the iron kingdoms should have more than two black dudes (Siege and Doc Killingsworth)

One thing on the Devil Dogs is I didn't glue on all the additional axes and guns that came in the pack. It just made them look really cluttered with all that extra kit on them.


Journeyman Warcaster (Female)

So I've played about 25 games with a journeyman caster using a proxy (Some caster from the iron kingdoms rpg)

I decided to actually get a journeyman caster, and picked the female one as I don't see her around often.

Followed the same "primary gold" scheme as I did with my other casters. The only slight adjustment was that I started using the new citadel metallics on this model. So far so good.

More Jacks

I finally finished off the Sentinel and the second Omni Jack. The Omni-jack was deliberately painted a higher shade of blue than my other jacks. I figured that if I'm using both Omni-jacks as Defenders or Ironclads it would be a good idea make them easily differentiated on the table.

Also, had some fun experimenting with smoke stacks and ave recently gone back and redone all my old jacks to have this feature. Its easy enough to do. Get some green stuff, roll it into thin tubes and then twirl them together, like a soft-serve ice cream cone. They can look a little rough, after all smoke is pretty chaotic.


That's all for now, I may try and get some nicer shots later on.... oh.... next up is the storm strider and its looking real good.

Monday, 21 May 2012

The 90 Minute Minute Man (Speed painting challenge)

Travel tools!
Well, I went away to Napier for the Highlander Tournament. Being a fool I decided to

A.) Change my list the night before the tournament

and B.) Buy and paint a new warjack the evening before the tournament started.

This was met with a chorus of "YOU MAD CRAZY FOOL" by many of those who travelled to the tournament. I was also determined not to miss out on dinner/drinking or socialising.

I left the dinner early and went back to our accommodation to glue the model together. I had brought all the supplies I needed from home and arranged them on a handy table in the room. I had really bad light to work by.


I rapidly assembled the Minuteman with glue purchased the night before, took roughly 30 minutes to do and was probably the most annoying part of the model. The base is an old 40k land speeder base that I chopped up with clippers and then surrounded with a clump of Milliput.

The base is drilled into the model using a small drill and wire and fixed in place with green stuff. I also grabbed some green stuff and rolled in "jet exhausts" which i fixed to the model. I then went and had some beers with everyone after they got back from dinner.


After 4 or 5 beers I went upstairs and under-coated the model with a brush, which is not the best technique ever, but I didn't feel comfortable using a spray at rented accommodation. The key to the undercoat with a brush was to get it covered without obscuring everything. It took a little retouching (And being able to paint it on the base was helpful). After this I went to bed.

Getting up in the morning I had to at least base coat the model for the first rounds (I didn't take any photos of this though, so all i have are "in game" shots from the day).

Three colours, Tin Bitz, Macgragge blue, and Leadbelcher. The key to painting fast is this stage and it is this.

Don't care about going over the lines.

Just go for it, get the basic areas covered in paint, if you slip up you can always retouch it later. To base coat the model I used a citadel basecoat brush and lathered on the paint (watered down of course.... having a sink in my room was very hand).


After day one was over I really didn't care about finishing off the paint job and spent the evening hanging out with the other tournament go'ers (And having AWESOME BBQ...... yeah.... awesome..... pfffft). Late in the evening I headed off to bed but the local nightclub was still playing music so decided to pain some more.

The pic on the left was from when I finished up, the base and inks are still wet. The key to doing detail quick is wet blending.

Those blue areas have three or four sets of highlights, all done within a short space while the paint is still wet. I simply get a big blob of blue on my palette and do each layer of highlighting one after the other with thin watered down paint. It all blends in and looks very smooth even though its basically cheating.

The metal area are even simpler, one highlight, one layer of ink and one layer of fine dry brushing the morning after (see photo on right).

Having the Minuteman at least basically painted on day one, and almost finished on day two was a good feeling for me. I hate playing with unpainted models, but I also wanted to spend time with the other guys playing the tourney. Painting quickly allowed me to do both, which was great fun.

Oh, there will be a battle report coming soon, Forbidden temple - A tale of two days.
Related Posts Plugin for WordPress, Blogger...