
Round 3 - Planning Phase
No major changes occurred in the "job review phase" and the command team looked the same as it did on turn one. I suspect this will change in the near future.
Logistics Phase
We tested the new logistics system, and it seemed to work pretty well. Even though i forgot a couple of the rules. A few more tweaks will be made and I'll publish the full rules and card set for it shortly.
Logistics managed a good haul of resources, enough to easily power the planned operations this turn. Here is the new board that includes manufacturing.

At the end of the round, the rebellion now has 1 production in all resources asides from Covert Networks and Safe Transports, and income is 8. I made some tweaks and gave them additional resources to make the system work.
Smuggling was a mixed bag. Roark managed to make a safe run to Naboo for supplies, Gran Dravis failed in his mission and was wounded (after losing some fighter escorts) and Oledeshu failed as well, before rolling the "snatch victory from defeat result" on the fail dice.
So with enough resources to plan out our attacks, we moved onto the next phase
Intelligence Phase
A concerted effort was made by intelligence command to get as many intelligence points as possible for this turn to support combat actions. Both Nibb Nibb and Sly rolled well, generating a whopping 16 intelligence points.
Ged'Ruh was sent on a sabotage mission at Korvas, which was a trap. Resulting in a failure. Intelligence spent intel points to reroll the failure dice, and he ended up escaping unscathed.
Diplomacy Phase
The diplomatic core tripled in size due to new postings, meaning Lianna isn't working alone anymore. She successfully established ties with Solitude X and Gidd Lonn did the same for Cahn. The results of these new diplomatic ties will be mentioned in the end phase.
Our friendly Ithorian hippy force user, Jah, was sent to meet with a mysterious contact who had hacked into Alliance communications networks. He successfully met with this individual, who has maintained absolute secrecy, speaking through droids only. He has arranged a "conference call" with the leaders of the rebellion so that this mysterious source can explain why he wishes to ally himself with the republic, and why he is being so secretive.
Fleet Command
Hearing of Ged's failure to knock out the Drydock at Korvas, Fleet Command decided to go with the backup plan. Hit the Imperial fleet facilities with everything they have, and some borrowed ships. 5 points of fleet favour were spent to obtain the services of an Assault frigate, and 8 stands of Z-95's and 3 Corvettes sent in.
The rebellion threw intelligence points, and additional resources from logistics to make this work. And the planning roll was...... barely a success. For their efforts, they get to deploy 2nd.
Squadron Command
Full of Blountism's, fighter command decided to do a very dangerous mission. Blast through the blockade on luxon, hit some imperial ground targets, buzz by the cities to show the flag, and escape.
A reasonable roll on the planning made this very dangerous mission potential winnable. With Initiative, deploying 2nd, and enemy reinforcements cut off. Still, with no less than 6 victory Star Destroyers in system, this was going to be tough.
Ground Command
Del Kern decided to personally plan this mission after the People's Movement voted to remove him from command and replace him with their man, Hallarn Yarn.
The mission, hit a storage facility on Zenith that is holding old-republic era fighters, rumored to be an entire squadron of Y-wings. The plan requires them to infiltrate the facility, eliminate the guards, and get the pilots to the fighters for them to escape. Another reasonable planning roll see's the rebels with initiative, deploying 2nd and flanking, and the enemy with no reinforcements.
Other
Recruitment gained three successes, and wants to recruit Pilots, Smugglers and Fleet Officers.
Training got 12 points to spend on training skills
R&D got 8 points to spend on Fleet research.
Intelligence also wants to research other temple sites on Axamar.
X-wing - The raid on Luxon
This mission was a tricky one, and gave the Rebels some hard decisions to make. While they did their flyby of Luxon easily enough, as they were leaving a group of civilian ships, attempting to flee the bloackade, followed them.They could flee at any time, but that would leave the civilians at the mercy of the Empire's fighters, mines and Star Destroyers.

The civilian ships were simply tokens with hitpoints on them. They could only move 2 ahead, or bank 2. Until the Commander gave the "all clear" order, in which case they could move ahead 4 or bank 2.
Victory points would be awarded if the civilian ships got within range one of the markers past the imperials and escaped. 3 for the GR-75, 2 for the YT's and 1 for the smaller ships. The Imperials only got VP's for killing freighters.
The mines in the picture were heavy duty anti shipping mines, that would only explode if a large base ship came within range 2 of them. Doing 2 dice damage per range band. What I didn't tell them, is that the Decimator could detonate them if it was within range 3 of them as an action.

The rebel fighters raced ahead and punched a hole in the minefield, but the decimator detonated one they didn't kill, taking out a headhunter and badly damaging another. At this point, the star destroyers began closing on the escapoe channel, represented by a pair of "targeting icons" from one of the large ship expansions. They started from the board edge, and moved in one range band each turn. (3 dice attack against anything in range)

The Rebels "broke and attacked" in an attempt to direct fire onto themselves and break up the tie formations.
In previous battles, the decider had been the concussion missiles on the headhunters, but in this battle, they were a non factor.
It was at this point that Blount was shot down by Imperial fire.
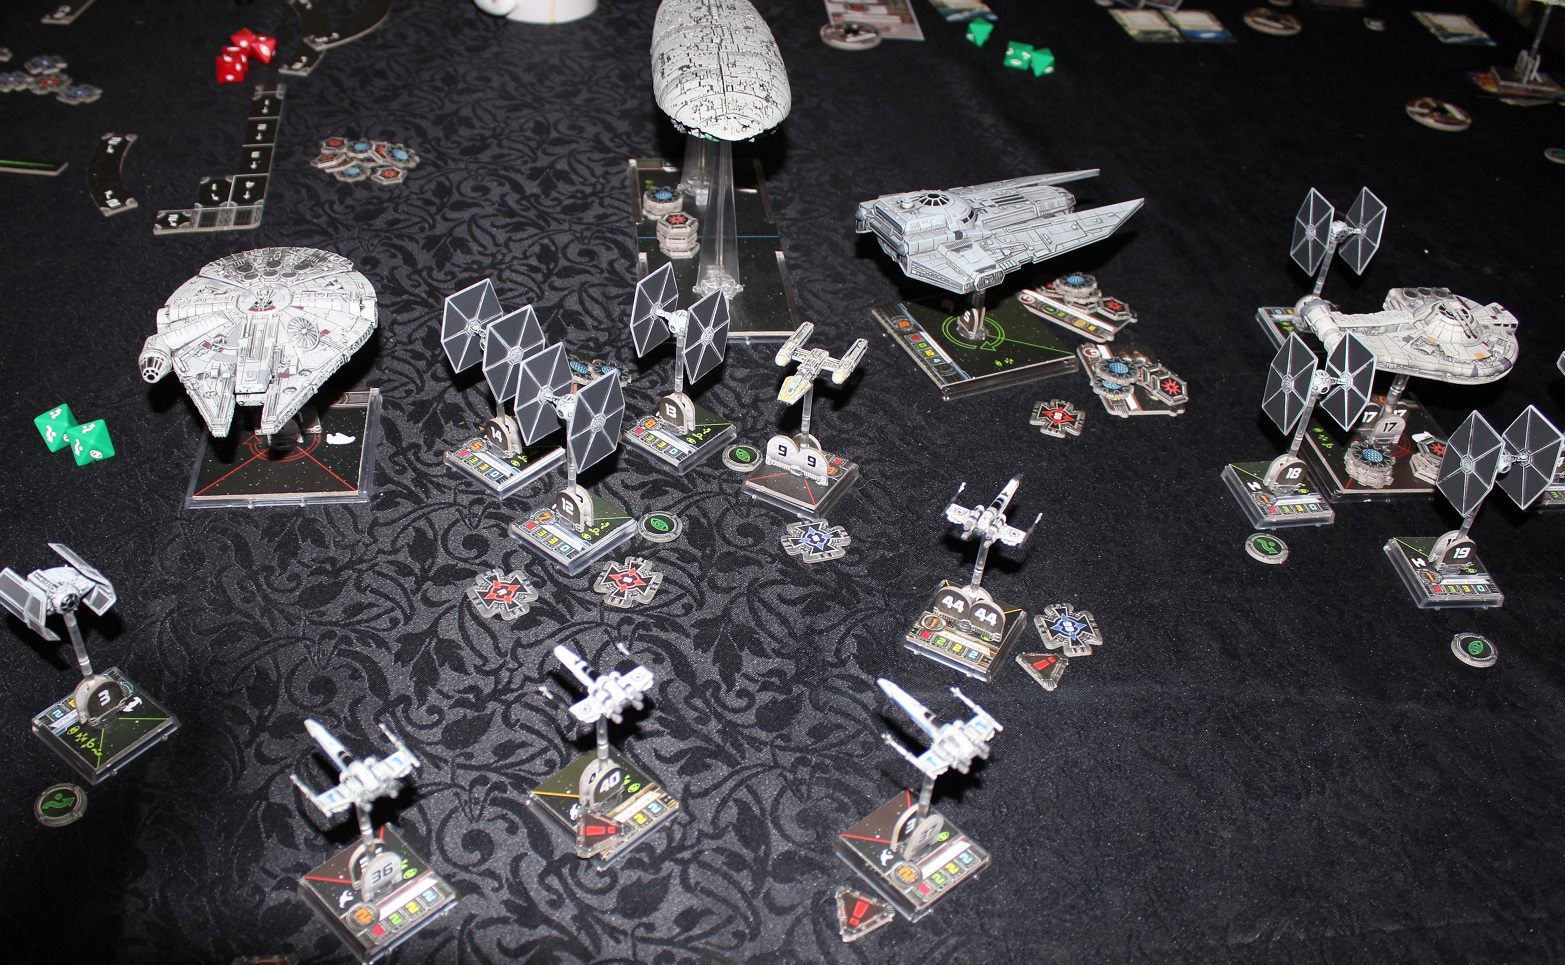
With the rebels slightly scattered, the right Tie squadron focussed on the YT-2400 and destroyed it.

From here on in, the rebels were outnumbered, and the focus became clearing lanes for the freighters.

It's worth noting that in this scenario, the Imperial's couldn't block the freighters movement, we used "Armada" style rules that allowed the player touched to move out of the way. We figured it was better than just "blocking" and it made the Empire have to focus fire.
It all came down to last round, as the Empire fired relentless on the GR-75 as it tried to escape. It limped accross the line with 2 damage boxes of its 13 left.

And while the rebels won 6-3 in victory points, they paid a heavy cost. 5 Z-95's shot down. And when we made the casualty rolls for those pilots, Blount rolled last.

Blount rolled a despair, which results in final character death. Blount was a real character in the campaign, a reckless foolhardy squadron leader who would shout "Damn the torpedoes, full speed ahead". I guess this means in our game reality, he won't be the door gunner on the Falcon at Endor.

Great stuff. I'm looking forward to seeing those rules when you get them all sorted out.
ReplyDeleteDraft versions of everything for the campaign are available here. https://www.dropbox.com/sh/92tkvr28s682rul/AABHa_-S2gFwk6RjJOy0R50Ha?dl=0
DeleteAwesome post. Nothing like the loss of a character to shatter some spirits.
ReplyDeleteI'm sure he will be a martyr to the cause, the crew will keep on Blounting in his name :)
Delete